AutoFXPro Copier: Difference between revisions
CT>Admin No edit summary |
|||
| (38 intermediate revisions by 2 users not shown) | |||
| Line 1: | Line 1: | ||
[[Category:forex]] | |||
= INTRODUCTION = | = INTRODUCTION = | ||
This page is entirely dedicated to the AutoFXPro Copier. This is by far the best copier on the market for the price - and it's constantly being developed. The dev is also very accessible to paid subscribers and usually answers in a short space of time. This page will have general setup details along with problems and troubleshooting solutions. | This page is entirely dedicated to the AutoFXPro Copier. This is by far the best copier on the market for the price - and it's constantly being developed. The dev is also very accessible to paid subscribers and usually answers in a short space of time. This page will have general setup details along with problems and troubleshooting solutions. | ||
Please note that all pictures can be clicked for a larger view if needed. | |||
__FORCETOC__ | __FORCETOC__ | ||
= CLIENTS = | = CLIENTS = | ||
== Money Management == | |||
This section is added due to questions being asked about the lot sizing to be used. While it's covered under the [[#6_.E2.80.93_Set_Lot_Size_By|SET LOT SIZE]] section, we'll give some more detail here. You may see that section for settings. | |||
[https://www.forextime.com/trading-tools/trading-calculator/pip-calculator https://www.forextime.com/trading-tools/trading-calculator/pip-calculator] | |||
According to the pip calculator linked above - 20 pips at 0.01 lots would yield $2.00. If a service targets 20 pips per day then you're looking at $2 daily. Calculating that for Mon-Fri that would be $10 per week. Sundays are excluded because some traders don't open positions on Sundays. | |||
At that rate you'd make $40 per month with those settings. If you want to make more then you'd have to increase your lot size and use the tool above to help with calculation. | |||
As for your maximum lot size - you need to find out how many positions the traders/providers will have open at any given point. Let's say for example that the service you signed up with will have an average of 5 positions open and you started with a $1,000 account. While your leverage may make working out more difficult, a general rule is to divide your balance by 10,000 - with a $1,000 account this would give a maximum lot size of 0.10. Divide that by an average of 5 open positions and you get a lot size of 0.02 that's recommended to be used. | |||
Depending on your risk appetite and leverage, you may increase your lot sizes. Just keep in mind the number of positions that the provider may have open. | |||
== INSTALLATION == | == INSTALLATION == | ||
Please note that in this document references will be made to MT4 as it is the primary platform used. The principles should also apply to MT5 even if not specified. | Please note that in this document references will be made to MT4 as it is the primary platform used. The principles should also apply to MT5 even if not specified. | ||
=== Setting Up Broker Software === | |||
It's recommended that a VPS is used to prevent issues. If your VPS was pre-loaded with MT4, or if you want to setup your own MT4, download and install the appropriate version. | It's recommended that a VPS is used to prevent issues. If your VPS was pre-loaded with MT4, or if you want to setup your own MT4, download and install the appropriate version. | ||
[[File:Afxpro-clients01.jpg|center|frame]] | |||
The setup process is automated and you just need to click NEXT, but if you have multiple MT4 versions already installed (from the same broker) you will have to choose the folder by clicking on SETTINGS. | The setup process is automated and you just need to click NEXT, but if you have multiple MT4 versions already installed (from the same broker) you will have to choose the folder by clicking on SETTINGS. | ||
[[File:Afxpro-clients02.jpg|center|frame]] | |||
Once you do this you will be prompted with a screen to specify the location of the install. If you’re not sure where you’re at – click on BROWSE and then view the folders before adding a number to the install you have. | Once you do this you will be prompted with a screen to specify the location of the install. If you’re not sure where you’re at – click on BROWSE and then view the folders before adding a number to the install you have. | ||
[[File:Afxpro-clients03. | [[File:Afxpro-clients03.1.png]] [[File:Afxpro-clients05.jpg]] [[File:Afxpro-clients04.jpg|RTENOTITLE]] | ||
[[File:Afxpro- | |||
Once you’ve completed this hit NEXT and the install will go to completion. Once it’s done hit FINISH. | Once you’ve completed this hit NEXT and the install will go to completion. Once it’s done hit FINISH. | ||
[[File:Afxpro-clients06.jpg|center]] | |||
[[File:Afxpro-clients06.jpg| | |||
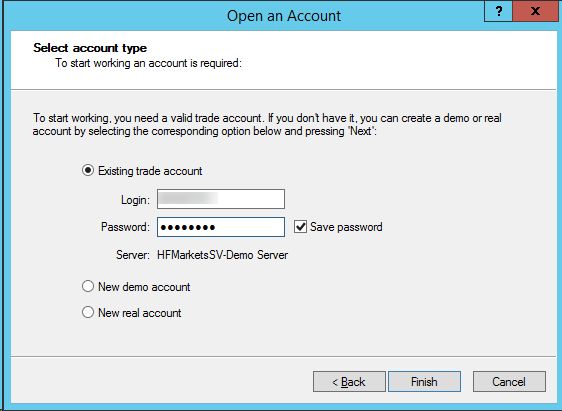
This will open your MT4 and you should then put in the details for the account you wish to use. | This will open your MT4 and you should then put in the details for the account you wish to use. | ||
[[File:Afxpro-clients07.jpg | === Signing Into MT4 === | ||
[[File:Afxpro-clients07.jpg]] [[File:Afxpro-clients08.jpg]] | |||
Once you’ve logged in you can now open the web browser (IE, FireFox, Chrome, etc.) and log in to your email account. You should have a link to some files. Download the appropriate one for your MT4 installation. | Once you’ve logged in you can now open the web browser (IE, FireFox, Chrome, etc.) and log in to your email account. You should have a link to some files. Download the appropriate one for your MT4 installation. | ||
[[File:Afxpro-clients09.jpg|center|frame]] | |||
=== Setting Up Copier EA === | |||
Your copy service provider may have given you a link to download the files - this can be from any source - Google Drive - DropBox - OneDrive - email - their own website - or a link to the original AutoFXPro site. Regardless, download the file that's appropriate for your installation. | Your copy service provider may have given you a link to download the files - this can be from any source - Google Drive - DropBox - OneDrive - email - their own website - or a link to the original AutoFXPro site. Regardless, download the file that's appropriate for your installation. | ||
[[File:Afxpro-clients10.jpg|center]] | |||
[[File:Afxpro-clients11.jpg|center]] | |||
Once you have this file downloaded, you will need to COPY the file. Do so by right-clicking and selecting COPY from the list of options. | Once you have this file downloaded, you will need to COPY the file. Do so by right-clicking and selecting COPY from the list of options. | ||
[[File:Afxpro-clients12.jpg|center]] | |||
Once this is done, go back to your MT4/5 and open the data folder. To do this, go to FILE then OPEN DATA FOLDER. | Once this is done, go back to your MT4/5 and open the data folder. To do this, go to FILE then OPEN DATA FOLDER. | ||
[[File:Afxpro-clients13.jpg|center]] | |||
[[File:Afxpro-clients14.jpg| | This will open an EXPLORER window to the data folder. You then need to navigate to MQL4\EXPERTS and paste the file. If you’re using MT5 the folder will be MQL5\EXPERTS | ||
[[File:Afxpro-clients14.jpg|center]] | |||
. | |||
[[File:Afxpro-clients15.jpg| | [[File:Afxpro-clients15.jpg|center]] | ||
Once in the EXPERTS folder you will RIGHT-CLICK and PASTE. | Once in the EXPERTS folder you will RIGHT-CLICK and PASTE. | ||
[[File:Afxpro-clients16.jpg| | [[File:Afxpro-clients16.jpg|center]] | ||
[[File:Afxpro-clients17.jpg| | [[File:Afxpro-clients17.jpg|center]] | ||
This will place the file you’ve downloaded into the EXPERTS folder. From here you go back to your MT4/5 which should be running. You may close all other open windows/programs except your MT4/5. | This will place the file you’ve downloaded into the EXPERTS folder. From here you go back to your MT4/5 which should be running. You may close all other open windows/programs except your MT4/5. | ||
| Line 68: | Line 85: | ||
Click on the + beside EXPERT ADVISORS in the “Navigator” window to expand the view. Then RIGHT-CLICK on EXPERT ADVISORS and go to REFRESH. | Click on the + beside EXPERT ADVISORS in the “Navigator” window to expand the view. Then RIGHT-CLICK on EXPERT ADVISORS and go to REFRESH. | ||
[[File:Afxpro-clients18.jpg| | [[File:Afxpro-clients18.jpg|center]] | ||
Once you do this the copier will show up in the list. If it doesn't, simply close your MT4 and open it after waiting a few seconds. | Once you do this the copier will show up in the list. If it doesn't, simply close your MT4 and open it after waiting a few seconds. | ||
[[File:Afxpro-clients19.jpg| | [[File:Afxpro-clients19.jpg|center]] | ||
| |||
| |||
=== Setting Up MT4 Options For Copier === | |||
Before adding the copier to the chart you must set some options first. Go to TOOLS/OPTIONS and then change these settings. | Before adding the copier to the chart you must set some options first. Go to TOOLS/OPTIONS and then change these settings. | ||
[[File:Afxpro-clients20.jpg| | [[File:Afxpro-clients20.jpg|center]] | ||
[[File:Afxpro-clients21.jpg| | [[File:Afxpro-clients21.jpg|center]] | ||
You will need to add the following URLs to the list. | You will need to add the following URLs to the list. | ||
*<nowiki>http://copy.autofxpro.com/</nowiki> | |||
| | ||
*<nowiki>http://register.autofxpro.com/</nowiki> | |||
At this point you may drag the copier onto the chart – where you may be prompted to update. If it does, allow the update by clicking YES. Then simply drag the copier back to the chart once it’s done. | At this point you may drag the copier onto the chart – where you may be prompted to update. If it does, allow the update by clicking YES. Then simply drag the copier back to the chart once it’s done. | ||
[[File:Afxpro-clients22.jpg| | [[File:Afxpro-clients22.jpg|center]] | ||
[[File:Afxpro-clients23.jpg| | [[File:Afxpro-clients23.jpg|center]] | ||
Once this is completed and you drag the copier back on the chart, it should look like the screen below. If not – maximize (make bigger) the chart you’re on. | Once this is completed and you drag the copier back on the chart, it should look like the screen below. If not – maximize (make bigger) the chart you’re on. | ||
[[File:Afxpro-clients24.jpg| | [[File:Afxpro-clients24.jpg|center]] | ||
| |||
=== Adding Provider (The Person You're Copying From) === | |||
From here you click on PROVIDER LIST and add the numbers you received in the email. Add the number under ACCOUNT NUMBER and under DESCRIPTION you can add whatever you like – “Uncle Lee” for example. | From here you click on PROVIDER LIST and add the numbers you received in the email. Add the number under ACCOUNT NUMBER and under DESCRIPTION you can add whatever you like – “Uncle Lee” for example. | ||
[[File:Afxpro-clients25.jpg| | [[File:Afxpro-clients25.jpg|center]] | ||
If you receive an error like the one below contact an admin in the group. This means that your account is not enabled on both sources as yet – you should wait for a confirmation email or message from an admin. If you received this confirmation but still get the error below then definitely contact an admin. | If you receive an error like the one below contact an admin in the group. This means that your account is not enabled on both sources as yet – you should wait for a confirmation email or message from an admin. If you received this confirmation but still get the error below then definitely contact an admin. | ||
[[File:Afxpro-clients26.jpg|center]] | |||
[[File:Afxpro-clients26.jpg| | |||
Once this is done – set your risk management and then leave it to copy. The copier allows you to set various options and the PDF manual you received should go into enough detail on how to set this up. | Once this is done – set your risk management and then leave it to copy. The copier allows you to set various options and the PDF manual you received should go into enough detail on how to set this up. | ||
[[File:Afxpro-clients27.jpg| | [[File:Afxpro-clients27.jpg|center]] | ||
The final step is to enable the copier after adding the providers. This is done by clicking on the button that says DISABLED at the bottom of the copier. | The final step is to enable the copier after adding the providers. This is done by clicking on the button that says DISABLED at the bottom of the copier. | ||
<p style="text-align: center;">'''<span style="font-size:20.0pt"><span style="line-height:115%">!!!NOTE!!!</span></span>'''</p> <p style="text-align: center;">'''<span style="font-size:20.0pt"><span style="line-height:115%">YOU DO NOT NEED TO OPEN MULTIPLE WINDOWS OR PAIRS WITH THE COPIER. ONLY ONE WINDOW /PAIR IS NEEDED WITH THE COPIER RUNNING. IT WILL AUTOMATICALLY COPY ALL TRADES DONE BY | <p style="text-align: center;">'''<span style="font-size:20.0pt"><span style="line-height:115%">!!!NOTE!!!</span></span>'''</p> <p style="text-align: center;">'''<span style="font-size:20.0pt"><span style="line-height:115%">YOU DO NOT NEED TO OPEN MULTIPLE WINDOWS OR PAIRS WITH THE COPIER. ONLY ONE WINDOW /PAIR IS NEEDED WITH THE COPIER RUNNING. IT WILL AUTOMATICALLY COPY ALL TRADES DONE BY YOUR PROVIDER. YOU ONLY NEED THE RECEIVER.</span></span>'''</p> | ||
The video shows the RECEIVER and SENDER – but you only need the receiver. The sender is running on | The video shows the RECEIVER and SENDER – but you only need the receiver. The sender is running on your provider's PC/server/VPS. | ||
=== Enabling The Copier === | |||
These last pictures show where to click to enable the copier AFTER adding the two provider numbers. | These last pictures show where to click to enable the copier AFTER adding the two provider numbers. | ||
[[index.php?title=File:Afxpro-clients28.jpg|center]] | |||
[[File:Afxpro-clients29.png|center|thumb|1000x1000px]] | |||
| |||
| |||
== SETTINGS == | |||
There are 15 main settings with various sub-settings. A 16th setting will be covered at the end. | |||
[[File:Afxpro-settings01.jpg|center|Afxpro-settings01.jpg]] | |||
=== 1 - The Provider List === | |||
[[File:Afxpro-settings02.jpg|center|Afxpro-settings02.jpg]] | |||
=== 2 - Mode === | |||
This changes between remote and local. If you’ve purchased the provider software and are running it on the same PC/laptop/VPS then you can switch to LOCAL mode. | |||
=== 3 – Transmission Data === | |||
This will either trade the account or just give you pop-up alerts of trades taken by your provider. | |||
| |||
=== 4 – Slippage === | |||
Slippage determines how far away from price a position will open/close. This is based on the lowest value available for the chart you are on. If your chart is in '''PIPS''' then it will be different from '''POINTS''' or '''PIPETTES'''. The default should be OK but modify as you wish. The image below shows what it would look like on a chart. You may zoom in for more details. | |||
<p style="text-align: center;">[[File:Afxpro-settings03.jpg|RTENOTITLE]]</p> <p style="text-align: center;"> </p> <p style="text-align: center;">[[File:Afxpro-settings04.jpg|RTENOTITLE]]</p> | |||
Again, this is not a comprehensive document, but intended to give a visual of what you should be looking for. If you need more details please consult the original manual. Some items are there that I may not fully understand the terminologies or what is meant by the person that originally wrote the program. Use or modification of the settings are done at your own risk – this is why each person has to change the settings to suit their needs. | |||
=== 5 – No Copy Later Than === | |||
This very useful feature ensures that no trades are taken if a certain amount of time (in seconds) has passed. | |||
| |||
=== 6 – Set Lot Size By === | |||
This section has 5 sub-sections. | |||
[[File:Afxpro-settings05.jpg|center|Afxpro-settings05.jpg]] | |||
==== 6.1 – Provider Risk Scaling ==== | |||
This opens trades based on the provider’s account size and lot size of their position versus your account size. This means if your account is $500 and the provider is $1,000 your lots will be opened at half of what the provider uses. Bear in mind that there is no position smaller than 0.01 and as a result trades taken at this size will be copied directly. | |||
==== 6.2 – Multiplied By Provider’s Lot Size ==== | |||
You can manually multiply the lot size that the provider uses to match your preference. | |||
==== 6.3 – Ratio With Receiver’s Balance ==== | |||
This will open the lots based on settings you place for the balance/equity you have available. | |||
==== 6.4 – Fixed Lot Size ==== | |||
This will open a fixed lot regardless of what lot size the provider uses. | |||
==== 6.5 – Stop Loss Risk Percentage ==== | |||
This will specify your risk for each trade if a stop-loss occurs. | |||
| |||
=== 7 – Risk Setting === | |||
This option changes based on the options you select. Examples (from an older version) can be seen below. You may click each image for a larger view. | |||
<p style="text-align: center;">[[File:Afxpro-settings06.jpg|100x200px|Afxpro-settings06.jpg]] [[File:Afxpro-settings07.jpg|100x200px|Afxpro-settings07.jpg]] [[File:Afxpro-settings08.jpg|100x200px|Afxpro-settings08.jpg]] [[File:Afxpro-settings09.jpg|100x200px|Afxpro-settings09.jpg]] [[File:Afxpro-settings10.jpg|100x200px|Afxpro-settings10.jpg]]</p> | |||
=== 8 – Max Lot Size === | |||
You can determine the maximum lot size to be opened overall by the copier. | |||
=== 9 – If DD Equity Reach % === | |||
You can set the copier to do various things if your equity gets to a certain point. These options include stopping the copier. | |||
[[File:Afxpro- | [[File:Afxpro-settings11.jpg|center|200x300px|Afxpro-settings11.jpg]] | ||
| | ||
= | === 10 – Copy Filter === | ||
You can decide with this option if you want to copy certain aspects of each trade or not. | |||
[[File: | === 11 – Order Filter === | ||
You can determine whether you want BUYS, SELLS or PENDINGS to be copied. | |||
| |||
=== 12 – Custom Pair === | |||
You can determine whether or not you only want certain pairs to be copied. The following information is taken directly from the manual - which should be available to you from your copy provider or the official website. | |||
<div style="background:#eeeeee;border:1px solid #cccccc;padding:5px 10px;"><q>Custom pair: Only copy trade of custom pair (combine with order types above). You can input multiple pairs by putting comma (,) or semicolon (;) between them. E.g: EURUSD; GBPUSD; USDJPY. You can also exclude the pairs by putting exclaimation (!) in front of the pairs. E.g: !EURUSD; !GBPUSD; !USDJPY.</q></div> | |||
=== 13 – Inverted Copy === | |||
This can be useful for a poorly performing provider/EA being copied. You can invert the buys/sells and use this to gain pips while the provider is losing. | |||
=== 14 – Enable / Disable Button === | |||
This enables or disables the copier. | |||
=== 15 – Copier Status === | |||
This shows the general state of the copier. | |||
=== 16 – Prefix & Suffix === | |||
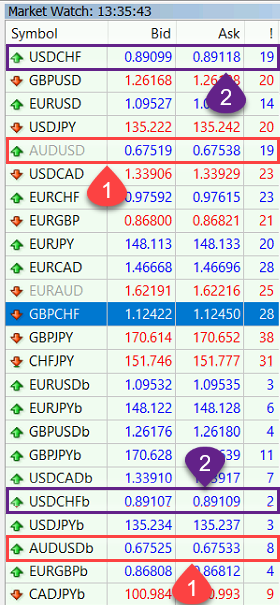
Some pairs may have prefix/suffix as seen in the example below. | |||
[[File:MarketWatchSuffix.png|frameless]] | |||
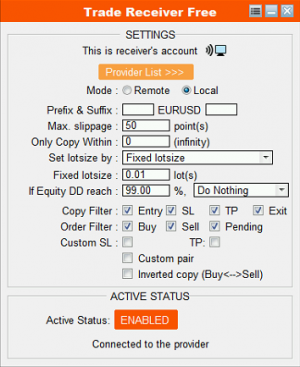
If this is the provider account then there's nothing to change. In later versions of the receiver however, there are options for prefix and suffix. | |||
[[File:CopierPrefixSuffix.png|frameless]] | |||
You'll notice the options near the top with an example of EURUSD given. In the market watch window example - if the receiver account has multiple pairs with varying prefix/suffix - and you've tested and confirmed which should be used based on your account - set the appropriate prefix/suffix for the one that should be copied to. Once done, the copier will copy to all pairs with the same prefix/suffix. The EURUSD given is an example for visual aid. | |||
== TROUBLESHOOTING == | |||
=== Account Not Accepted === | |||
[[File:Afxpro-clients26.jpg|center|frameless|461x461px]] | |||
If you have waited 24-48 hours and are still getting this message contact an admin. | If you have waited 24-48 hours and are still getting this message contact an admin. | ||
== Auto Trading Is Disabled == | === Auto Trading Is Disabled === | ||
[[File:Afxpro-ts02.png|center|Afxpro-ts02.png]] | [[File:Afxpro-ts02.png|center|Afxpro-ts02.png]] | ||
| Line 144: | Line 288: | ||
[[File:Afxpro-ts05.png|center|Afxpro-ts05.png]] | [[File:Afxpro-ts05.png|center|Afxpro-ts05.png]] | ||
== Constant Error Notification == | === Constant Error Notification === | ||
[[File:Afxpro-ts06.jpg|center|Afxpro-ts06.jpg]]If you notice this error please place the copier on a new chart with no indicators. It may be required to have another MT4 specifically for the copier as other indicators may conflict with the copier. | [[File:Afxpro-ts06.jpg|center|Afxpro-ts06.jpg]]If you notice this error please place the copier on a new chart with no indicators. It may be required to have another MT4 specifically for the copier as other indicators may conflict with the copier. | ||
== Copier Not Working == | === Copier Not Working === | ||
Double check your settings with pages 10-12 of the setup document. Ensure the following URLs are in MT4: | Double check your settings with pages 10-12 of the setup document. Ensure the following URLs are in MT4: | ||
*<nowiki>http://copy.autofxpro.com/</nowiki> | |||
| |||
*<nowiki>http://register.autofxpro.com/</nowiki> | |||
Also verify that the MT4 number you gave is correct. The number is usually copied and pasted into the program, so if there is a missing or incorrect digit there may have been a typo at submission. Contact a member of the admin team if you suspect your number is incorrect. | Also verify that the MT4 number you gave is correct. The number is usually copied and pasted into the program, so if there is a missing or incorrect digit there may have been a typo at submission. Contact a member of the admin team if you suspect your number is incorrect. | ||
== Copier Not Updating == | === Copier Not Updating === | ||
This is similar to the error above. Ensure that you have HTTP and not HTTPS as well as check back the settings above. | This is similar to the error above. Ensure that you have HTTP and not HTTPS as well as check back the settings above. | ||
== Trades Duplicated == | === Trades Duplicated === | ||
This is usually caused by multiple instances of the copy receiver running. There should only be ONE instance. This means that the receiver should be on one chart – one MT4 – one machine. Places to check for additional running copiers are: | This is usually caused by multiple instances of the copy receiver running. There should only be ONE instance. This means that the receiver should be on one chart – one MT4 – one machine. Places to check for additional running copiers are: | ||
| Line 172: | Line 321: | ||
If you only have ONE INSTANCE of the copier running and are getting duplicates please contact a member of the admin team in the Telegram group. | If you only have ONE INSTANCE of the copier running and are getting duplicates please contact a member of the admin team in the Telegram group. | ||
== Cannot Add Provider == | === Cannot Add Provider === | ||
[[File:Afxpro-ts07.png|center|Afxpro-ts07.png]] | [[File:Afxpro-ts07.png|center|Afxpro-ts07.png]] | ||
| Line 178: | Line 327: | ||
This error may come up as a result of removing the providers from your list. This may also be due to some issue with the copier on UL’s end. If this happens please advise an administrator and request that the copier at the provider side be checked and possibly disabled/re-enabled. | This error may come up as a result of removing the providers from your list. This may also be due to some issue with the copier on UL’s end. If this happens please advise an administrator and request that the copier at the provider side be checked and possibly disabled/re-enabled. | ||
== Lot Sizes Fixed To Multiples of 1 Lot == | === Lot Sizes Fixed To Multiples of 1 Lot === | ||
Ensure that the copier is running on a chart that supports the lot sizes you want. For safety use a regular pair on a chart like EUR/USD. | Ensure that the copier is running on a chart that supports the lot sizes you want. For safety use a regular pair on a chart like EUR/USD. | ||
=== Fluctuating TP === | |||
== Fluctuating TP == | |||
=== Broker (FIFO) Issue === | ==== Broker (FIFO) Issue ==== | ||
The first thing to do is verify whether or not your broker is a US regulated (FIFO ). Please see the link below for more details. | The first thing to do is verify whether or not your broker is a US regulated (FIFO ). Please see the link below for more details. | ||
| Line 194: | Line 341: | ||
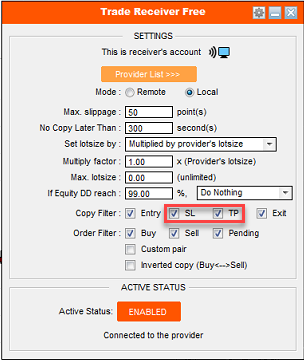
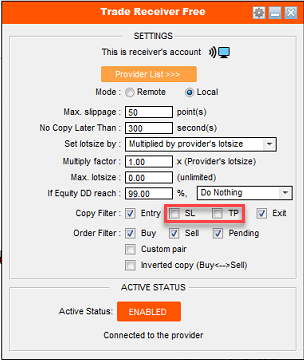
From what we’ve seen, multiple positions of the same size on the same pair need to have the same TP. For this issue you would have to change the broker. If you don’t want to change the broker then the fluctuations will continue. | From what we’ve seen, multiple positions of the same size on the same pair need to have the same TP. For this issue you would have to change the broker. If you don’t want to change the broker then the fluctuations will continue. | ||
=== Additional EA Issue === | A workaround would be to disable the copying of the SL and TP. The trades should still close on your account once they are closed on the provider side. This will also allow you to set your own SL/TP. | ||
<p style="text-align: center;">[[File:Afxpro-SLTP1.png|RTENOTITLE]] [[File:Afxpro-SLTP2.png|RTENOTITLE]]</p> | |||
If this does not work for you - then you may have to change the broker. Check your journal for any messages similar to the one pictured below. | |||
[[File:Afxpro-FIFO.png|center|Afxpro-FIFO.png]] | |||
==== Additional EA Issue ==== | |||
Based on discussions with the developer of the copy software, it may be due to conflicts with another EA on the system. It is best to run the copier on a clean MT4 installation. | Based on discussions with the developer of the copy software, it may be due to conflicts with another EA on the system. It is best to run the copier on a clean MT4 installation. | ||
| Line 202: | Line 355: | ||
When setting up your MT4 click on SETTINGS and add a character or number to the end of the install path and the program group. Install the copier on this new setup and the problem should go away. Please see the setup documentation for additional screenshots. | When setting up your MT4 click on SETTINGS and add a character or number to the end of the install path and the program group. Install the copier on this new setup and the problem should go away. Please see the setup documentation for additional screenshots. | ||
=== Copier Enabled But No Trades === | |||
This error was seen when the copier was not updated. Ensure that all of the URLs are put in (see [[#Copier_Not_Working|COPIER NOT WORKING]] section). Ensure that AUTO TRADING is enabled. Please see the [[#Setting_Up_MT4_Options_For_Copier|INSTALLATION SECTION]] for additional information. | |||
[[File:Afxpro-clients21.jpg|RTENOTITLE]][[File:Afxpro-ts11.png|RTENOTITLE]] | |||
| |||
This error | === Error: Add URL (But You Already Added It) === | ||
If the copier keeps showing an error to add a URL to MT4 but you've already added it, most likely you're on a laptop and it's not plugged in. This error comes up whenever the copier cannot reach the URL. This can be caused by: | |||
*Laptop in power saving mode periodically cutting data transmissions over wifi. | |||
*PC/laptop waking from sleep mode. | |||
*PC/laptop having internet connection problems. | |||
To fix this - with laptops - usually it means keeping them plugged in. There are no details on any specific power management settings at this time, but that's the most likely reason why this error would keep showing up. | |||
=== Cannot Update === | |||
<p style="text-align: center;">[[File:Afxpro update error.jpg|RTENOTITLE]]</p> | |||
If you can't update the copier there are two options. | |||
#Download the latest version from the autofxpro.com website. | |||
#Download the older version from Google Drive and then allow it to update when started. | |||
Both options have been tested and proven to work. Pick whichever is more convenient. You may have the old version in your '''DOWNLOADS''' folder. You could try option 2 first if this is so. | |||
= PROVIDERS = | |||
As with the clients, the documentation assumes that you're using MT4. The instructions are exactly the same for MT5 - just follow and use the EX5 instead of the EX4 file if you have MT5. | |||
== Installing == | |||
It's assumed that you already have your MT4 platform setup. You should have gotten a download link after purchasing the software. Extract the files and then go into your EXPERTS folder for the MT4 that you'll be using. | |||
[[File:Afxpro-provider01.jpg|center|640x480px|Afxpro-provider01.jpg]][[File:Afxpro-provider02.jpg|center|640x480px|Afxpro-provider02.jpg]][[File:Afxpro-provider03.jpg|center|640x480px|Afxpro-provider03.jpg]][[File:Afxpro-provider04.jpg|center|640x480px|Afxpro-provider04.jpg]]Copy the EX4 to the EXPERTS folder. | |||
[[File:Afxpro-provider05.jpg|center|640x480px|Afxpro-provider05.jpg]]Refresh your Expert Advisors in MT4 or restart MT4. | |||
[[File:Afxpro-provider06.jpg|center|640x480px|Afxpro-provider06.jpg]]Go to OPTIONS and then put in the URLs. | |||
*<nowiki>http://copy.autofxpro.com/</nowiki> | |||
| | ||
[[Category: | *<nowiki>http://register.autofxpro.com/</nowiki> | ||
[[File:Afxpro-provider07.jpg|center|640x480px|Afxpro-provider07.jpg]][[File:Afxpro-clients21.jpg|center|Afxpro-clients21.jpg]] | |||
== Setting Up License == | |||
Once you're done - double click on the AutoFxPro EA from the list in the navigator window. You may also drag it onto the chart. Switch to the INPUTS tab and put in your email address and license key. | |||
[[File:Afxpro-provider09.jpg|center|640x480px|Afxpro-provider09.jpg]][[File:Afxpro-provider10.jpg|center|640x480px|Afxpro-provider10.jpg]][[File:Afxpro-provider12.jpg|center|640x480px|Afxpro-provider12.jpg]]If your details are correct, the copier will be registered and you can proceed. If the copier was not up to date then you'll be prompted to update thereafter. | |||
[[File:Afxpro-provider13.jpg|center|640x480px|Afxpro-provider13.jpg]][[File:Afxpro-provider14.jpg|center|640x480px|Afxpro-provider14.jpg]]If the program shows EXITING, PLEASE WAIT - just wait until the chart is clear. | |||
[[File:Afxpro-provider15.jpg|center|640x480px|Afxpro-provider15.jpg]]Once it's done - double click on it again (or drag it onto the chart). You do not need to put back your registration details if it was successfully registered initially. The details are saved and the values are blank so that persons won't be able to see and steal your key for usage. | |||
[[File:Afxpro-provider16.jpg|center|640x480px|Afxpro-provider16.jpg]] | |||
== Adding Receivers / Local Copies == | |||
The copier may be used in remote or local mode. In remote mode you must add the MT4 account number for each receiver. In local mode you only need the provider number to be placed in each client. | |||
=== Remote Provider === | |||
If you're going to be sending signals over the internet, then ensure that you have the account numbers for the persons that will be copying. If your service is a paid service then check your subscription list and you can then enable/disable receivers as needed. Firstly, go to the RECEIVER LIST. | |||
[[File:Afxpro-provider17.jpg|center|640x480px|Afxpro-provider17.jpg]][[File:Afxpro-provider18.jpg|center|640x480px|Afxpro-provider18.jpg]]From this screen you can add the ACCOUNT NUMBER for each receiver along with a DESCRIPTION. Usually the subscriber name or email address is placed here to make them easier to be found. You may also set an EXPIRY which would automatically disable the account once the expiry date is reached. | |||
=== Local Copy === | |||
This mode is faster than remote and the prompt that appears when you switch the modes tells you just that. | |||
[[File:Afxpro-provider19.jpg|center|640x480px|Afxpro-provider19.jpg]][[File:Afxpro-provider20.jpg|center|640x480px|Afxpro-provider20.jpg]][[File:Afxpro-provider21.jpg|center|640x480px|Afxpro-provider21.jpg]]Just like the receiver - you simply press the DISABLED button to enable the provider. Note that in LOCAL mode there is no subscriber list. All you need to do is put in the provider number in all of the receivers for trades to be copied. | |||
[[Category:Forex]] | |||
Latest revision as of 06:55, 10 May 2023
INTRODUCTION
This page is entirely dedicated to the AutoFXPro Copier. This is by far the best copier on the market for the price - and it's constantly being developed. The dev is also very accessible to paid subscribers and usually answers in a short space of time. This page will have general setup details along with problems and troubleshooting solutions.
Please note that all pictures can be clicked for a larger view if needed.
CLIENTS
Money Management
This section is added due to questions being asked about the lot sizing to be used. While it's covered under the SET LOT SIZE section, we'll give some more detail here. You may see that section for settings.
https://www.forextime.com/trading-tools/trading-calculator/pip-calculator
According to the pip calculator linked above - 20 pips at 0.01 lots would yield $2.00. If a service targets 20 pips per day then you're looking at $2 daily. Calculating that for Mon-Fri that would be $10 per week. Sundays are excluded because some traders don't open positions on Sundays.
At that rate you'd make $40 per month with those settings. If you want to make more then you'd have to increase your lot size and use the tool above to help with calculation.
As for your maximum lot size - you need to find out how many positions the traders/providers will have open at any given point. Let's say for example that the service you signed up with will have an average of 5 positions open and you started with a $1,000 account. While your leverage may make working out more difficult, a general rule is to divide your balance by 10,000 - with a $1,000 account this would give a maximum lot size of 0.10. Divide that by an average of 5 open positions and you get a lot size of 0.02 that's recommended to be used.
Depending on your risk appetite and leverage, you may increase your lot sizes. Just keep in mind the number of positions that the provider may have open.
INSTALLATION
Please note that in this document references will be made to MT4 as it is the primary platform used. The principles should also apply to MT5 even if not specified.
Setting Up Broker Software
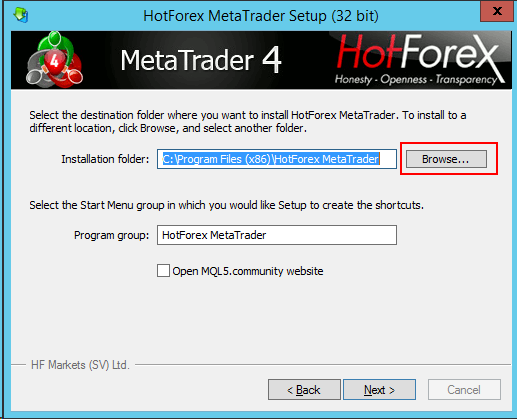
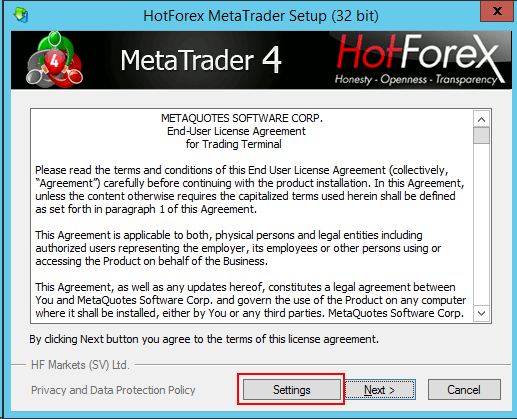
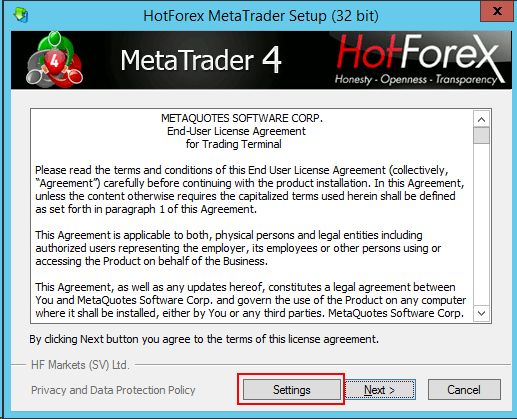
It's recommended that a VPS is used to prevent issues. If your VPS was pre-loaded with MT4, or if you want to setup your own MT4, download and install the appropriate version.
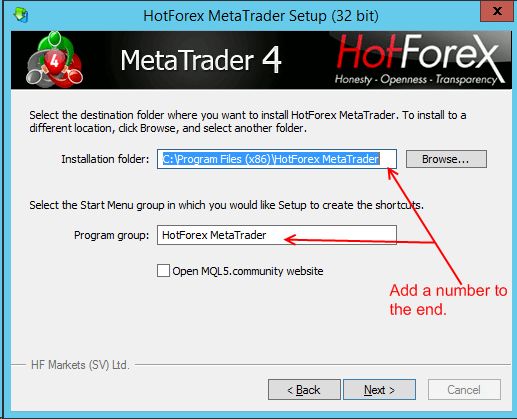
The setup process is automated and you just need to click NEXT, but if you have multiple MT4 versions already installed (from the same broker) you will have to choose the folder by clicking on SETTINGS.
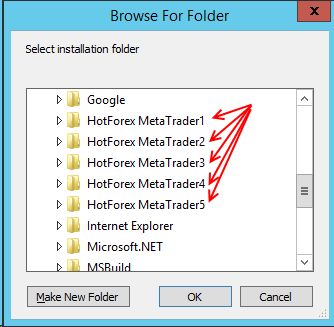
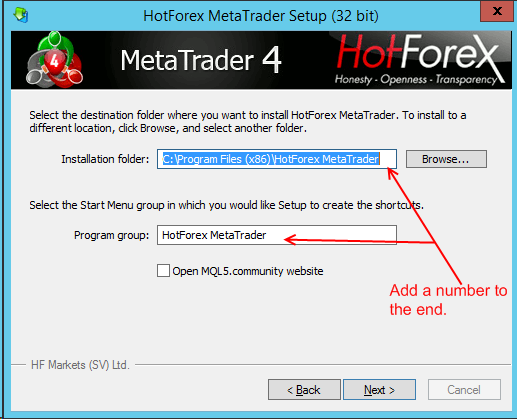
Once you do this you will be prompted with a screen to specify the location of the install. If you’re not sure where you’re at – click on BROWSE and then view the folders before adding a number to the install you have.
Once you’ve completed this hit NEXT and the install will go to completion. Once it’s done hit FINISH.

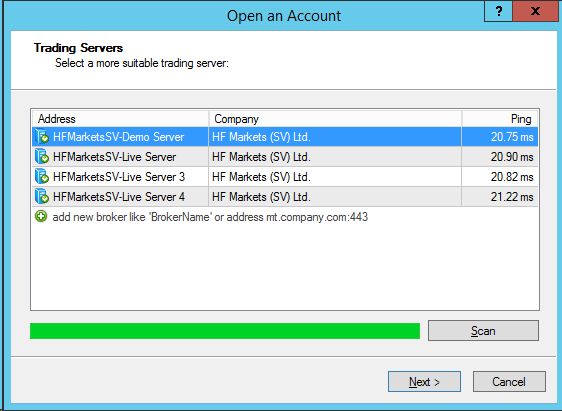
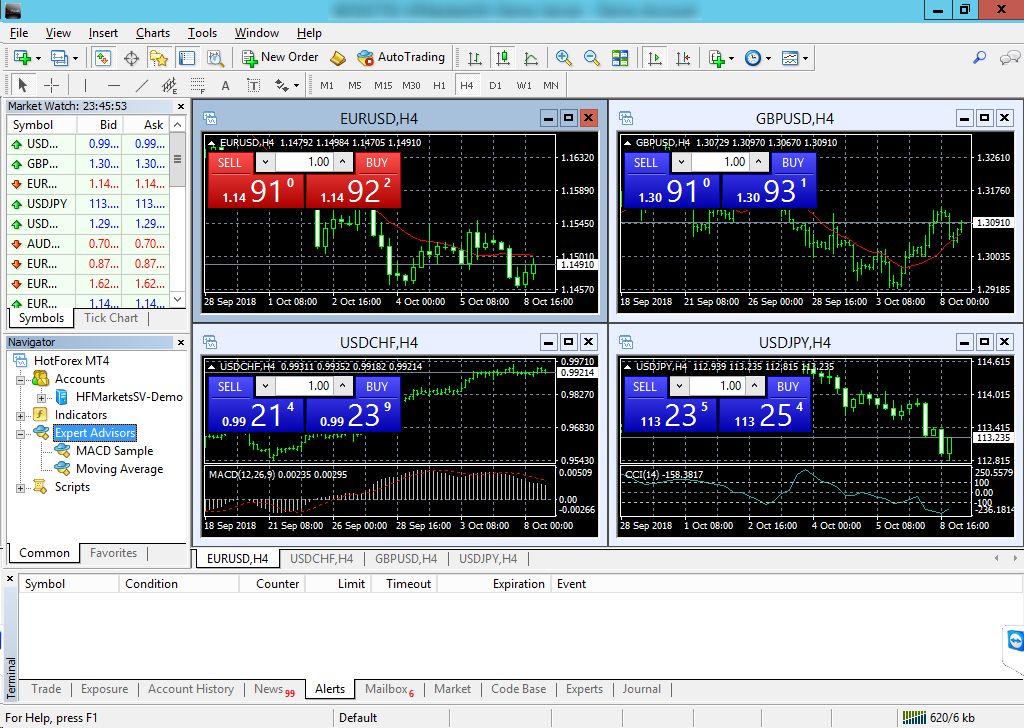
This will open your MT4 and you should then put in the details for the account you wish to use.
Signing Into MT4
Once you’ve logged in you can now open the web browser (IE, FireFox, Chrome, etc.) and log in to your email account. You should have a link to some files. Download the appropriate one for your MT4 installation.
Setting Up Copier EA
Your copy service provider may have given you a link to download the files - this can be from any source - Google Drive - DropBox - OneDrive - email - their own website - or a link to the original AutoFXPro site. Regardless, download the file that's appropriate for your installation.
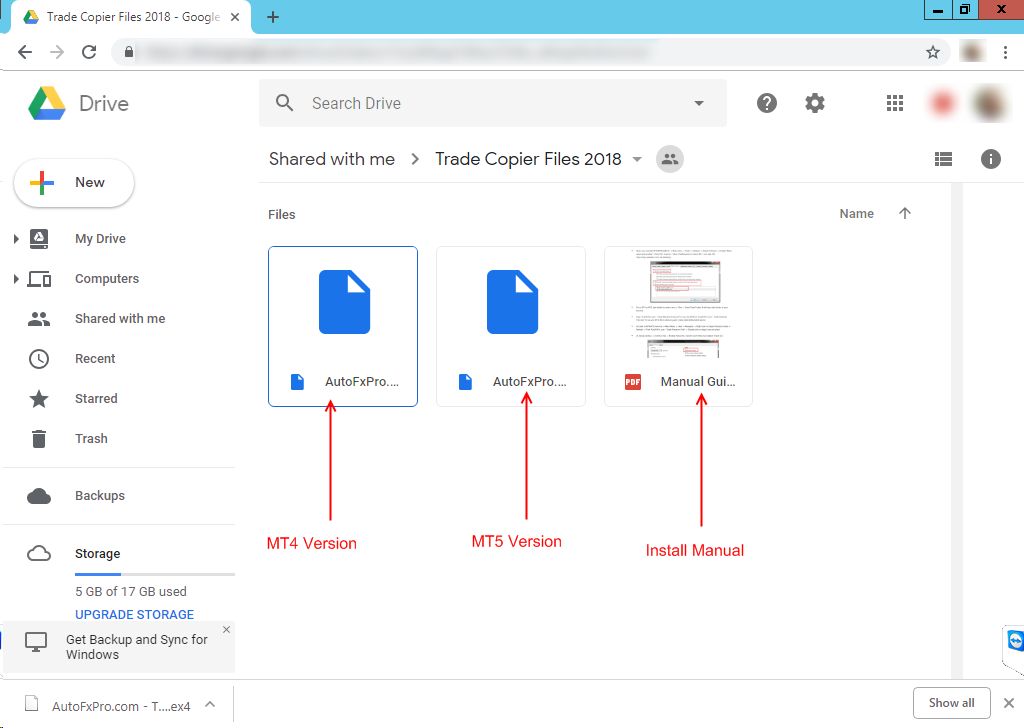
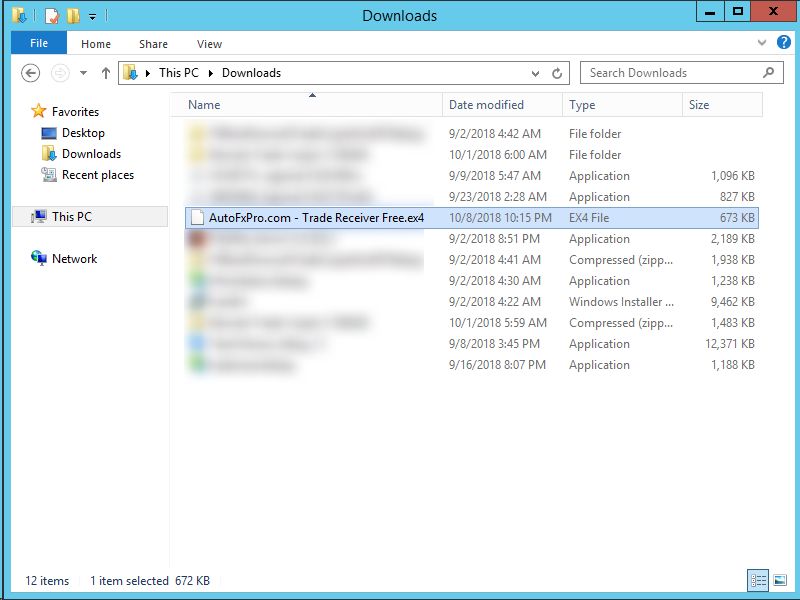
Once you have this file downloaded, you will need to COPY the file. Do so by right-clicking and selecting COPY from the list of options.
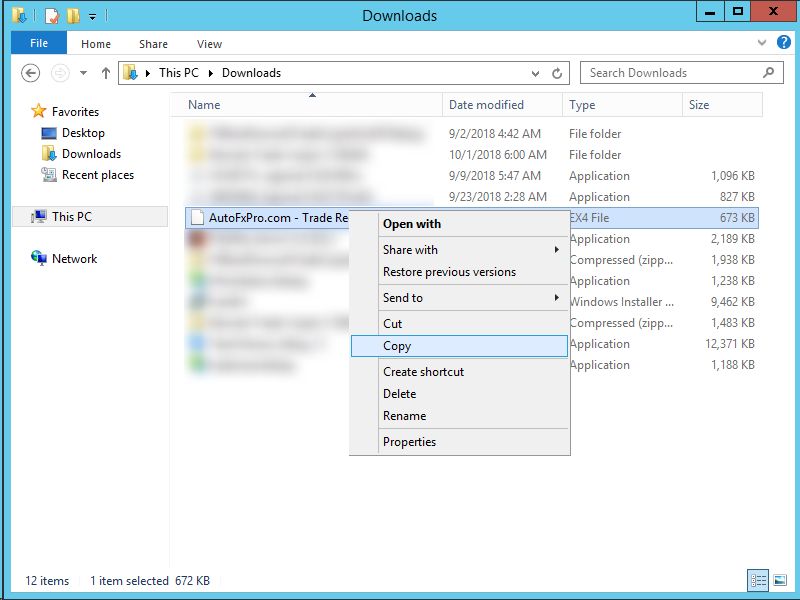
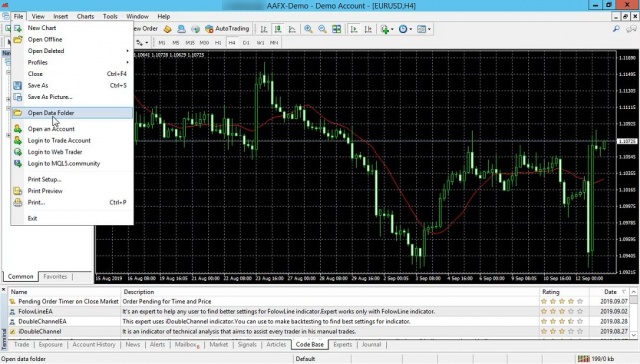
Once this is done, go back to your MT4/5 and open the data folder. To do this, go to FILE then OPEN DATA FOLDER.
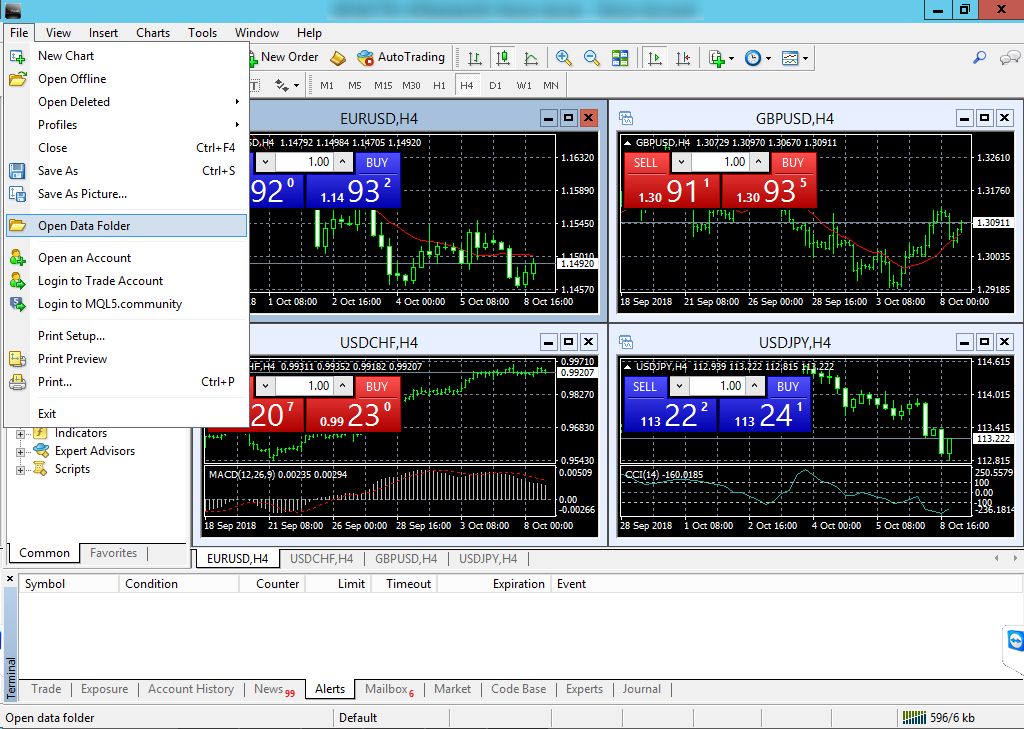
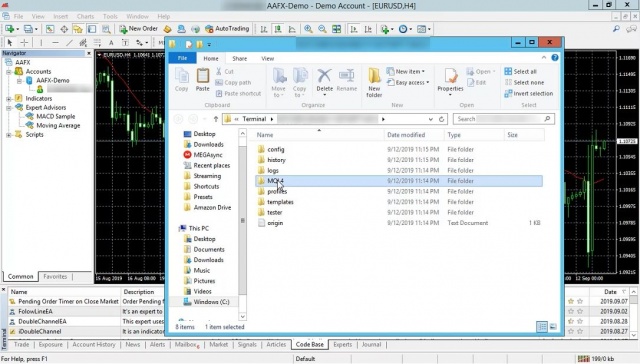
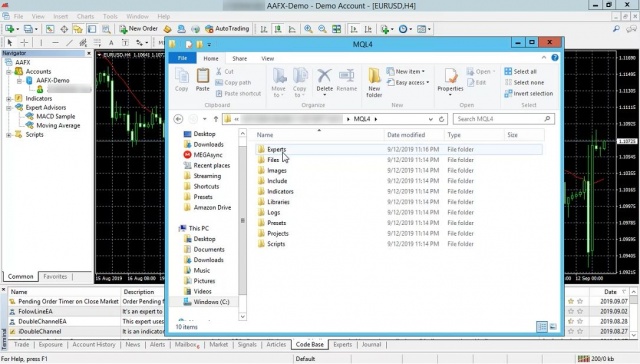
This will open an EXPLORER window to the data folder. You then need to navigate to MQL4\EXPERTS and paste the file. If you’re using MT5 the folder will be MQL5\EXPERTS
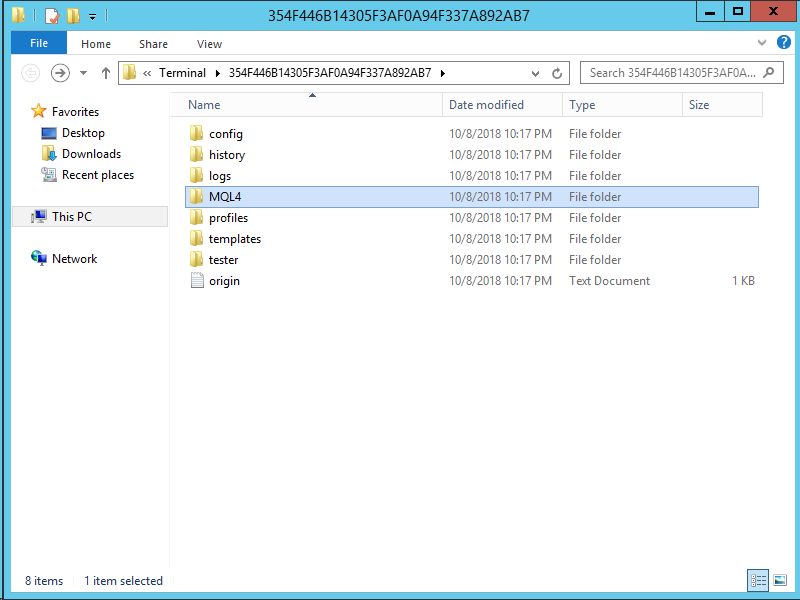
.
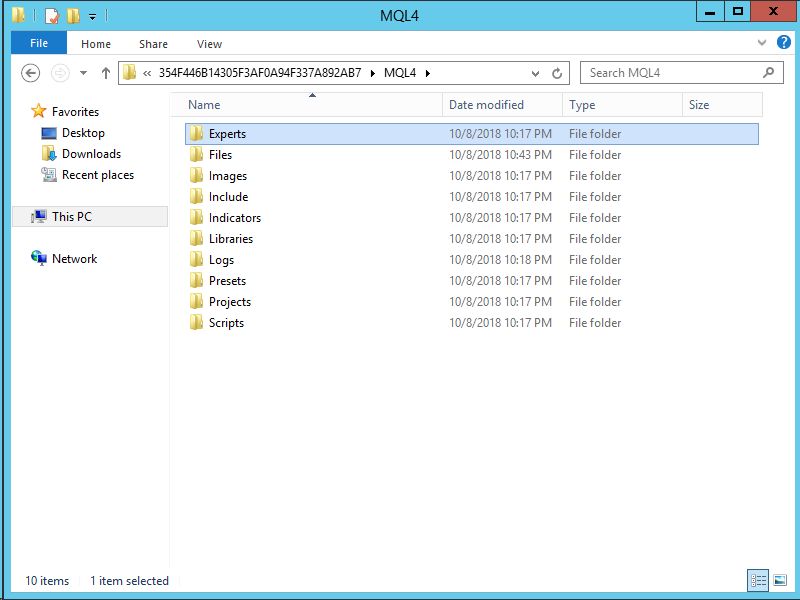
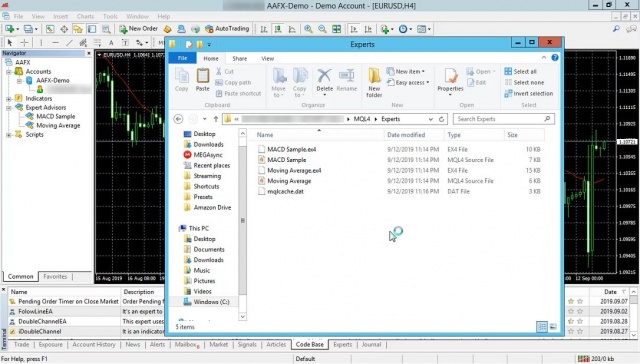
Once in the EXPERTS folder you will RIGHT-CLICK and PASTE.
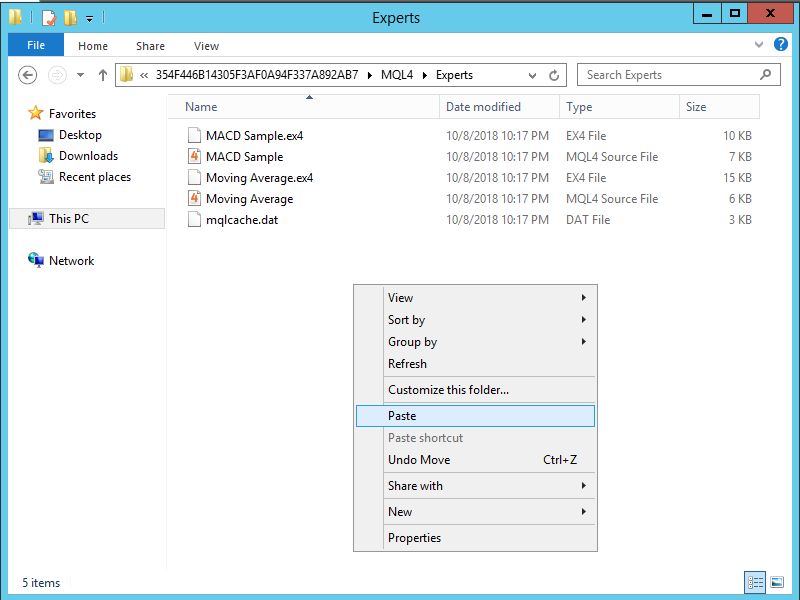
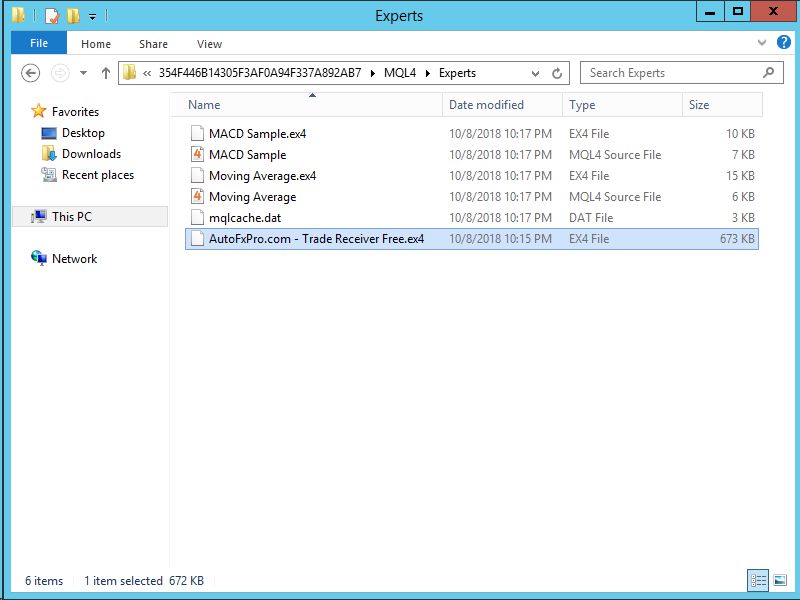
This will place the file you’ve downloaded into the EXPERTS folder. From here you go back to your MT4/5 which should be running. You may close all other open windows/programs except your MT4/5.
Click on the + beside EXPERT ADVISORS in the “Navigator” window to expand the view. Then RIGHT-CLICK on EXPERT ADVISORS and go to REFRESH.
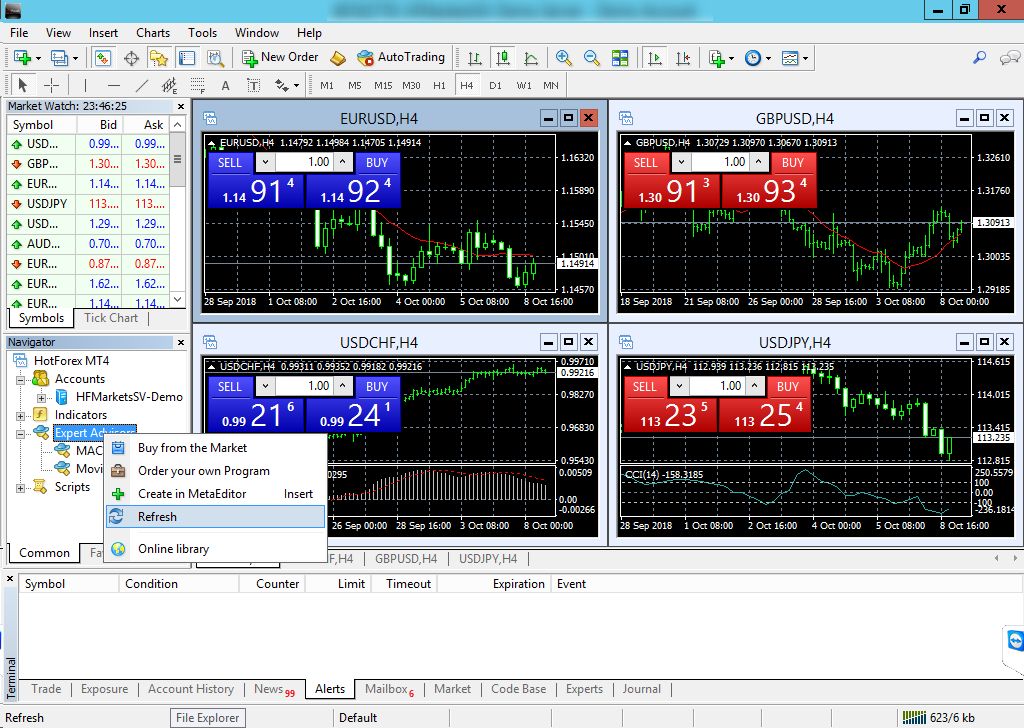
Once you do this the copier will show up in the list. If it doesn't, simply close your MT4 and open it after waiting a few seconds.
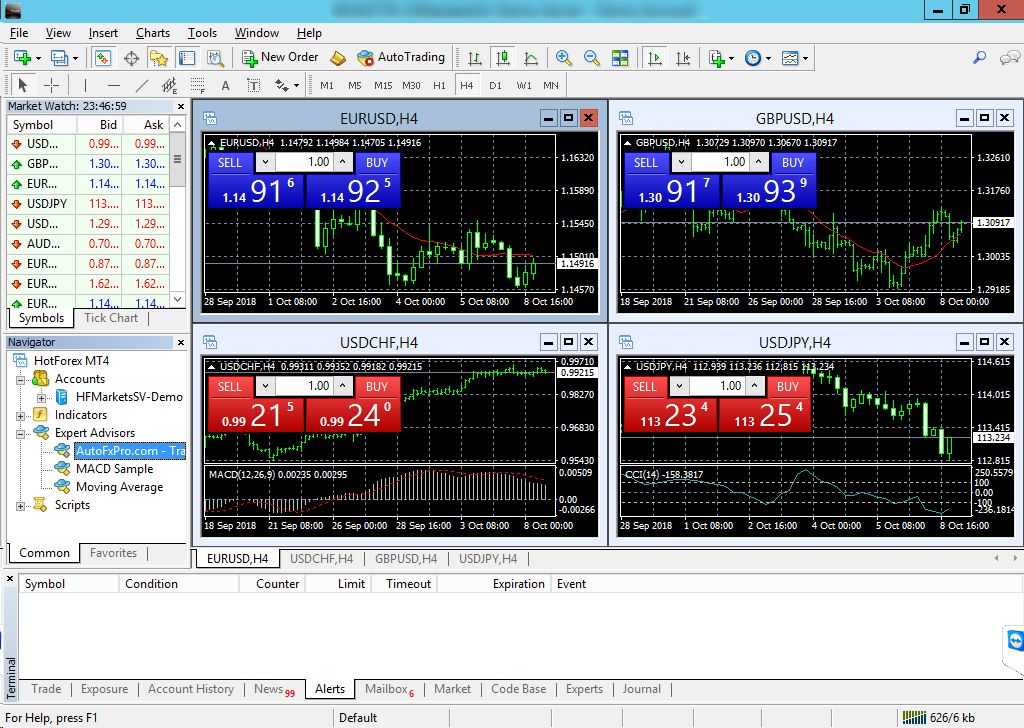
Setting Up MT4 Options For Copier
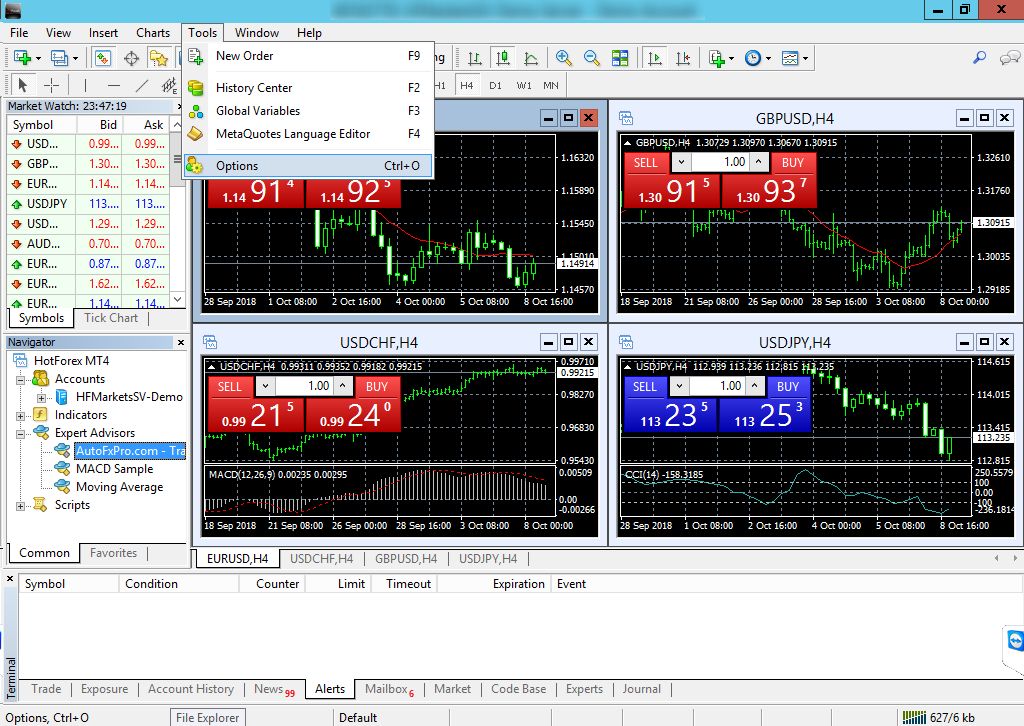
Before adding the copier to the chart you must set some options first. Go to TOOLS/OPTIONS and then change these settings.
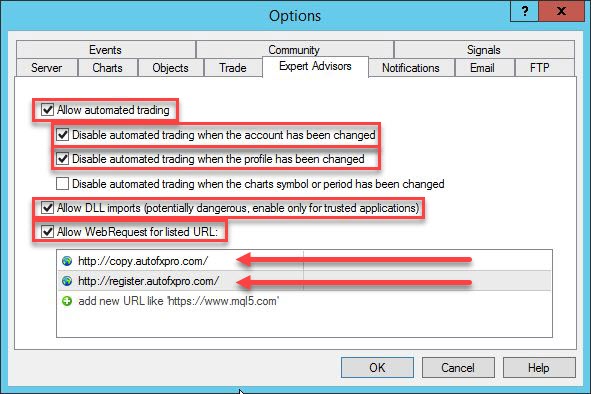
You will need to add the following URLs to the list.
- http://copy.autofxpro.com/
- http://register.autofxpro.com/
At this point you may drag the copier onto the chart – where you may be prompted to update. If it does, allow the update by clicking YES. Then simply drag the copier back to the chart once it’s done.
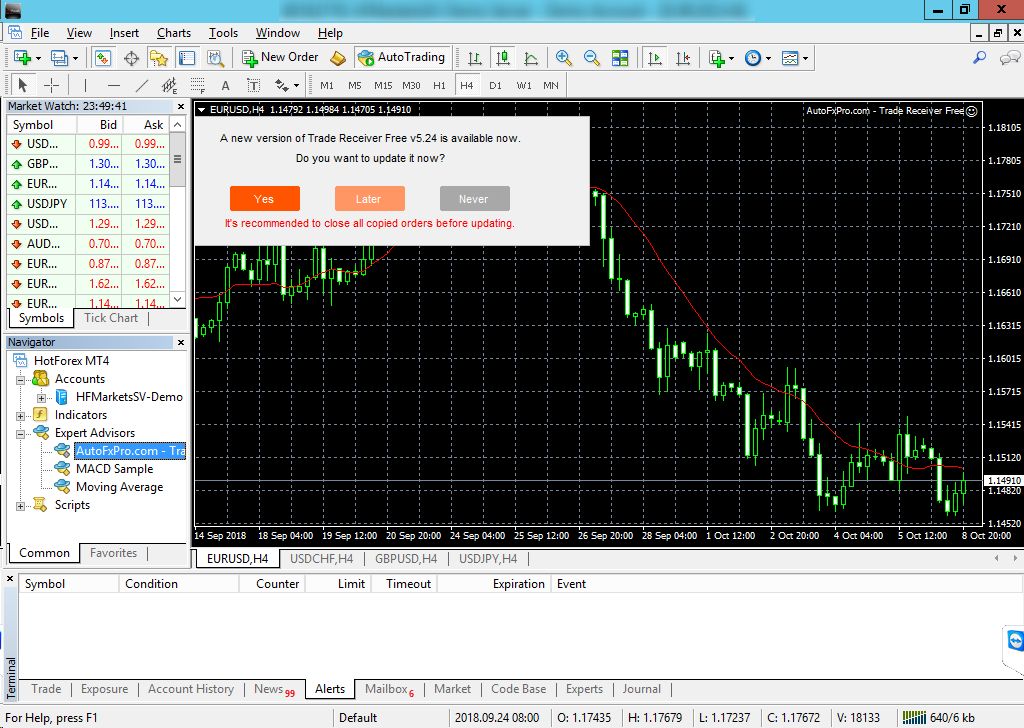
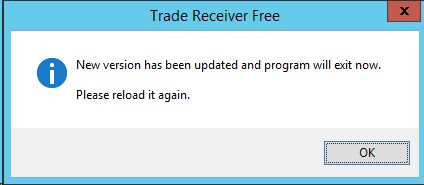
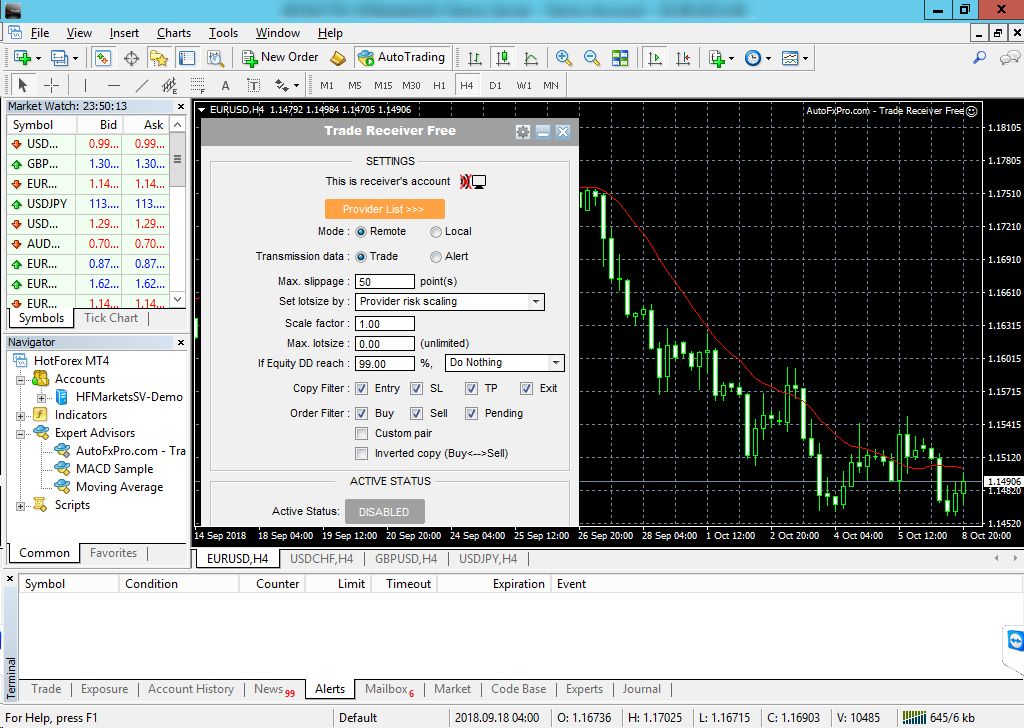
Once this is completed and you drag the copier back on the chart, it should look like the screen below. If not – maximize (make bigger) the chart you’re on.
Adding Provider (The Person You're Copying From)
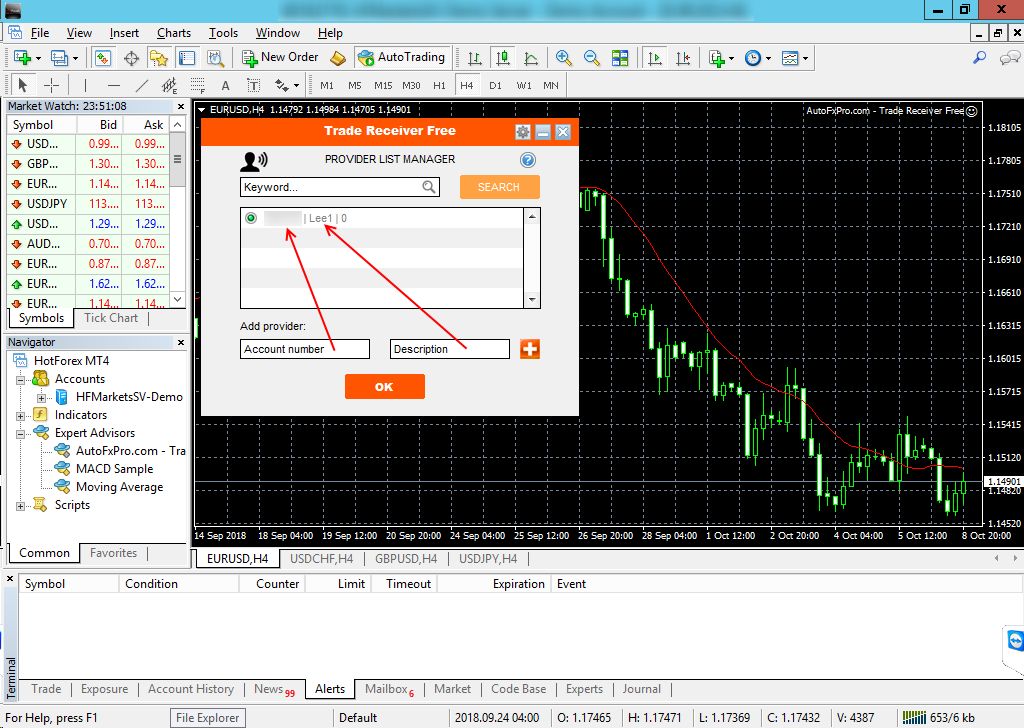
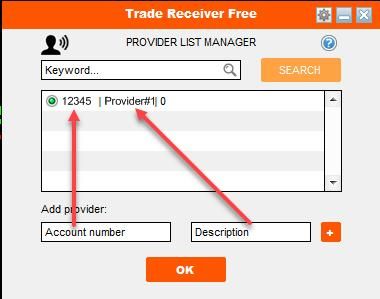
From here you click on PROVIDER LIST and add the numbers you received in the email. Add the number under ACCOUNT NUMBER and under DESCRIPTION you can add whatever you like – “Uncle Lee” for example.
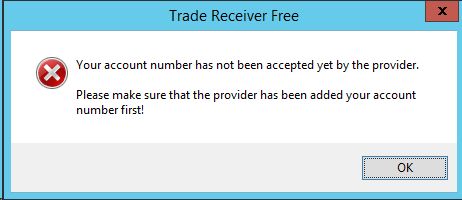
If you receive an error like the one below contact an admin in the group. This means that your account is not enabled on both sources as yet – you should wait for a confirmation email or message from an admin. If you received this confirmation but still get the error below then definitely contact an admin.
Once this is done – set your risk management and then leave it to copy. The copier allows you to set various options and the PDF manual you received should go into enough detail on how to set this up.
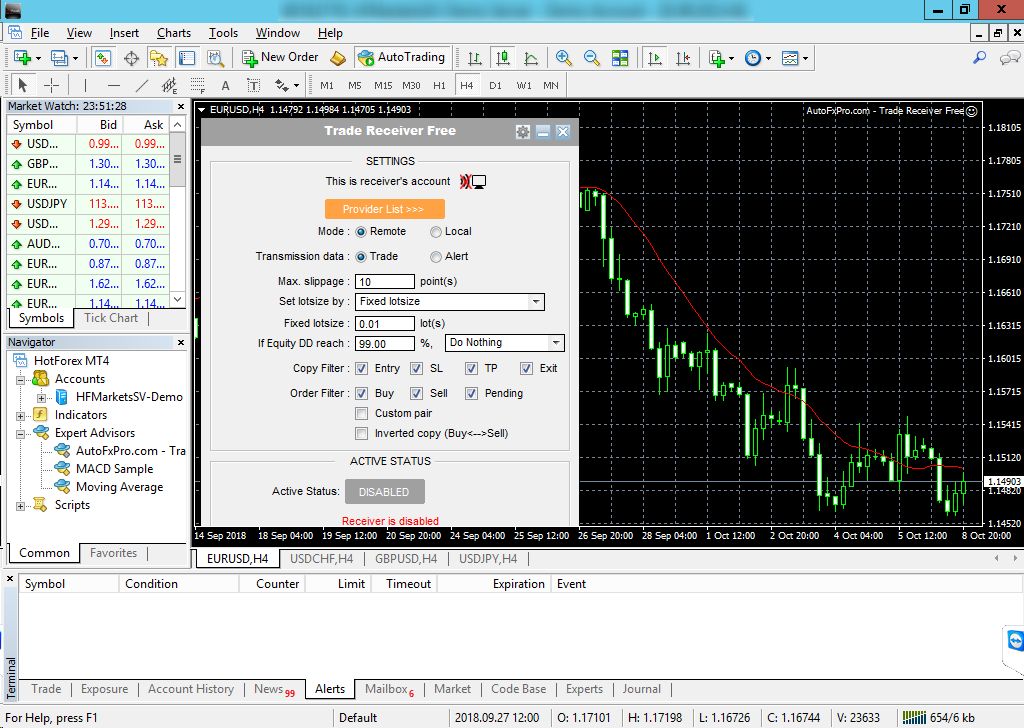
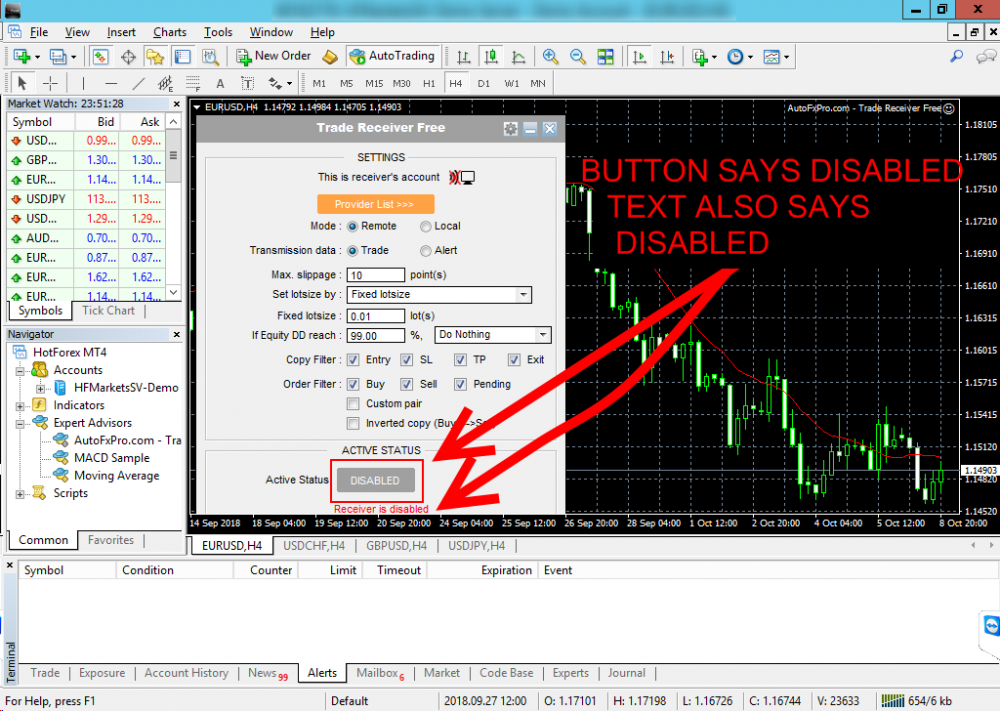
The final step is to enable the copier after adding the providers. This is done by clicking on the button that says DISABLED at the bottom of the copier.
!!!NOTE!!!
YOU DO NOT NEED TO OPEN MULTIPLE WINDOWS OR PAIRS WITH THE COPIER. ONLY ONE WINDOW /PAIR IS NEEDED WITH THE COPIER RUNNING. IT WILL AUTOMATICALLY COPY ALL TRADES DONE BY YOUR PROVIDER. YOU ONLY NEED THE RECEIVER.
The video shows the RECEIVER and SENDER – but you only need the receiver. The sender is running on your provider's PC/server/VPS.
Enabling The Copier
These last pictures show where to click to enable the copier AFTER adding the two provider numbers. center
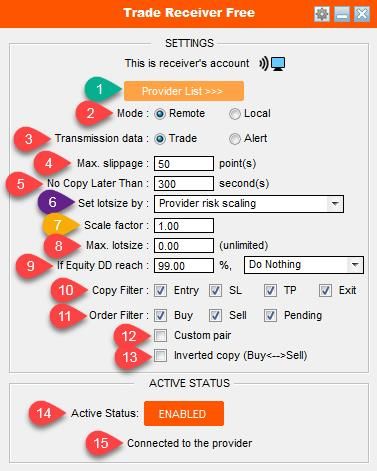
SETTINGS
There are 15 main settings with various sub-settings. A 16th setting will be covered at the end.
1 - The Provider List
2 - Mode
This changes between remote and local. If you’ve purchased the provider software and are running it on the same PC/laptop/VPS then you can switch to LOCAL mode.
3 – Transmission Data
This will either trade the account or just give you pop-up alerts of trades taken by your provider.
4 – Slippage
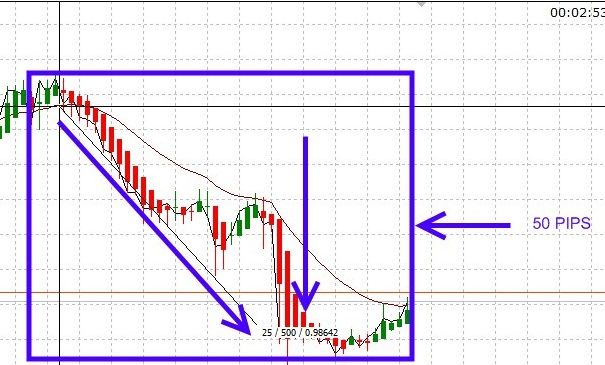
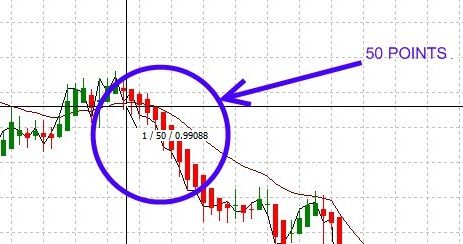
Slippage determines how far away from price a position will open/close. This is based on the lowest value available for the chart you are on. If your chart is in PIPS then it will be different from POINTS or PIPETTES. The default should be OK but modify as you wish. The image below shows what it would look like on a chart. You may zoom in for more details.
Again, this is not a comprehensive document, but intended to give a visual of what you should be looking for. If you need more details please consult the original manual. Some items are there that I may not fully understand the terminologies or what is meant by the person that originally wrote the program. Use or modification of the settings are done at your own risk – this is why each person has to change the settings to suit their needs.
5 – No Copy Later Than
This very useful feature ensures that no trades are taken if a certain amount of time (in seconds) has passed.
6 – Set Lot Size By
This section has 5 sub-sections.
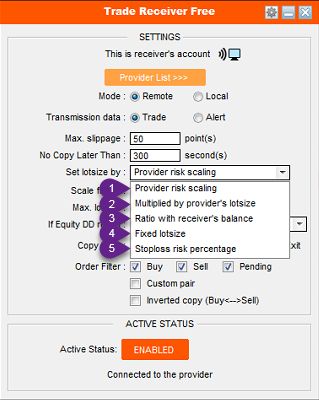
6.1 – Provider Risk Scaling
This opens trades based on the provider’s account size and lot size of their position versus your account size. This means if your account is $500 and the provider is $1,000 your lots will be opened at half of what the provider uses. Bear in mind that there is no position smaller than 0.01 and as a result trades taken at this size will be copied directly.
6.2 – Multiplied By Provider’s Lot Size
You can manually multiply the lot size that the provider uses to match your preference.
6.3 – Ratio With Receiver’s Balance
This will open the lots based on settings you place for the balance/equity you have available.
6.4 – Fixed Lot Size
This will open a fixed lot regardless of what lot size the provider uses.
6.5 – Stop Loss Risk Percentage
This will specify your risk for each trade if a stop-loss occurs.
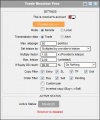
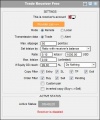
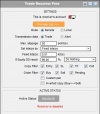
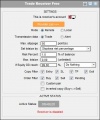
7 – Risk Setting
This option changes based on the options you select. Examples (from an older version) can be seen below. You may click each image for a larger view.
8 – Max Lot Size
You can determine the maximum lot size to be opened overall by the copier.
9 – If DD Equity Reach %
You can set the copier to do various things if your equity gets to a certain point. These options include stopping the copier.
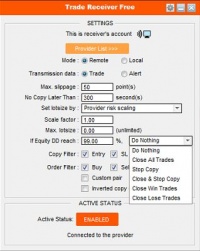
10 – Copy Filter
You can decide with this option if you want to copy certain aspects of each trade or not.
11 – Order Filter
You can determine whether you want BUYS, SELLS or PENDINGS to be copied.
12 – Custom Pair
You can determine whether or not you only want certain pairs to be copied. The following information is taken directly from the manual - which should be available to you from your copy provider or the official website.
Custom pair: Only copy trade of custom pair (combine with order types above). You can input multiple pairs by putting comma (,) or semicolon (;) between them. E.g: EURUSD; GBPUSD; USDJPY. You can also exclude the pairs by putting exclaimation (!) in front of the pairs. E.g: !EURUSD; !GBPUSD; !USDJPY.
13 – Inverted Copy
This can be useful for a poorly performing provider/EA being copied. You can invert the buys/sells and use this to gain pips while the provider is losing.
14 – Enable / Disable Button
This enables or disables the copier.
15 – Copier Status
This shows the general state of the copier.
16 – Prefix & Suffix
Some pairs may have prefix/suffix as seen in the example below.
If this is the provider account then there's nothing to change. In later versions of the receiver however, there are options for prefix and suffix.
You'll notice the options near the top with an example of EURUSD given. In the market watch window example - if the receiver account has multiple pairs with varying prefix/suffix - and you've tested and confirmed which should be used based on your account - set the appropriate prefix/suffix for the one that should be copied to. Once done, the copier will copy to all pairs with the same prefix/suffix. The EURUSD given is an example for visual aid.
TROUBLESHOOTING
Account Not Accepted
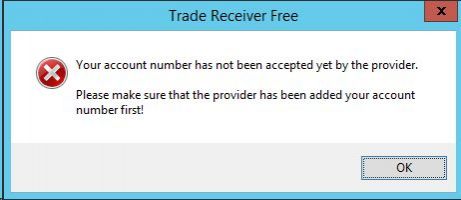
If you have waited 24-48 hours and are still getting this message contact an admin.
Auto Trading Is Disabled
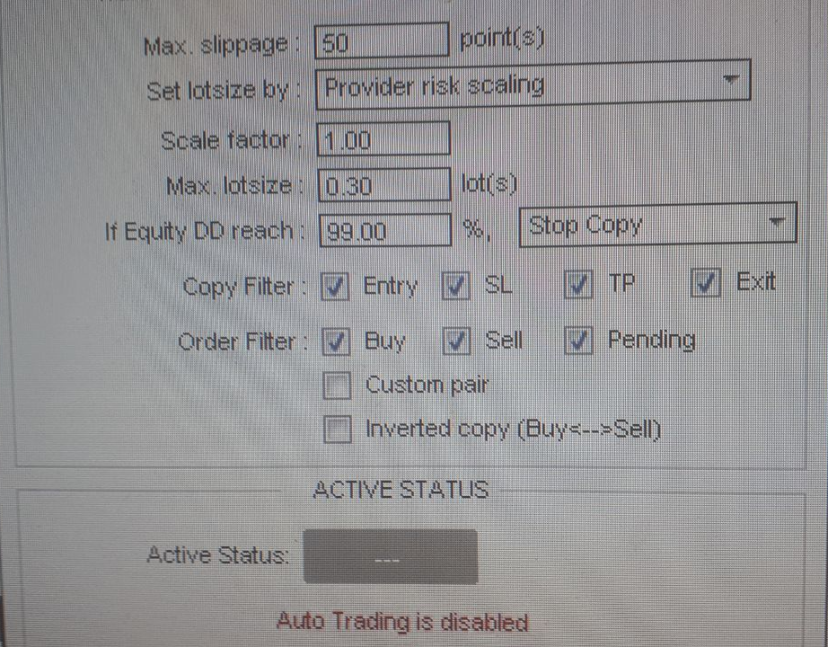
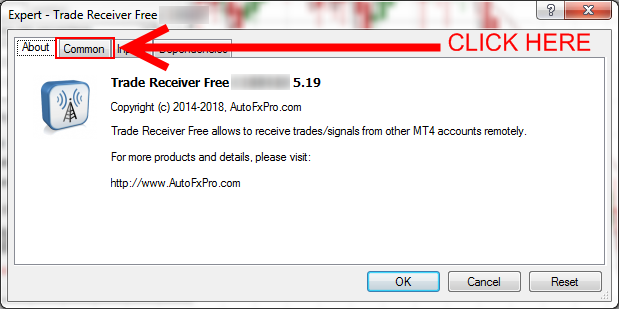
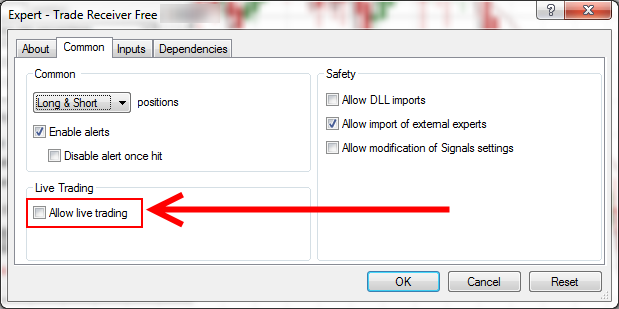
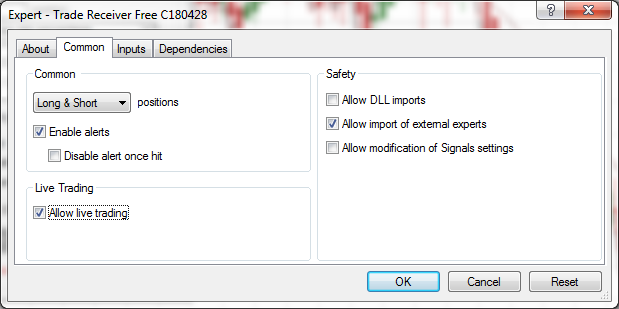
If you are getting this message then you probably did not follow the instructions on page 11 of this document. Please review and then press F7 on your keyboard which will bring up the properties for the copier. Click on COMMON and then ALLOW LIVE TRADING. Please see photos of that below. Ensure it is checked.
The final product should look like the one below. Once done, click on OK and proceed with the setup.
Constant Error Notification
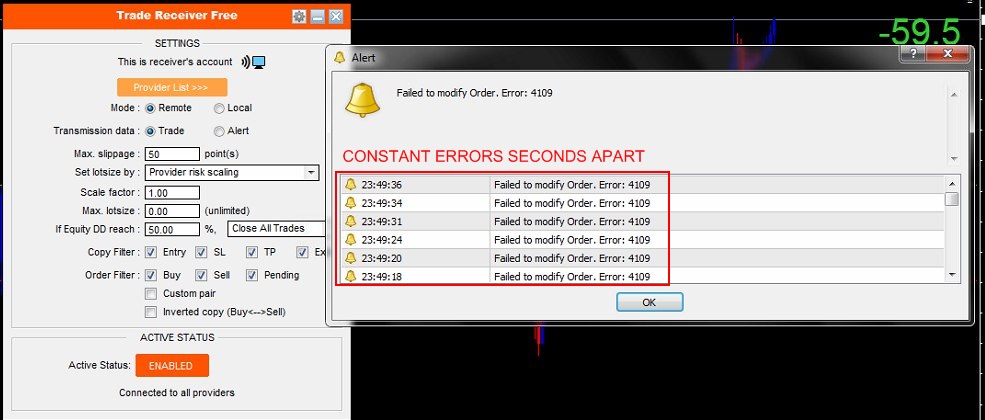
If you notice this error please place the copier on a new chart with no indicators. It may be required to have another MT4 specifically for the copier as other indicators may conflict with the copier.
Copier Not Working
Double check your settings with pages 10-12 of the setup document. Ensure the following URLs are in MT4:
- http://copy.autofxpro.com/
- http://register.autofxpro.com/
Also verify that the MT4 number you gave is correct. The number is usually copied and pasted into the program, so if there is a missing or incorrect digit there may have been a typo at submission. Contact a member of the admin team if you suspect your number is incorrect.
Copier Not Updating
This is similar to the error above. Ensure that you have HTTP and not HTTPS as well as check back the settings above.
Trades Duplicated
This is usually caused by multiple instances of the copy receiver running. There should only be ONE instance. This means that the receiver should be on one chart – one MT4 – one machine. Places to check for additional running copiers are:
- Another chart in your MT4
- Your PC
- Your Laptop
- Your VPS
If you only have ONE INSTANCE of the copier running and are getting duplicates please contact a member of the admin team in the Telegram group.
Cannot Add Provider
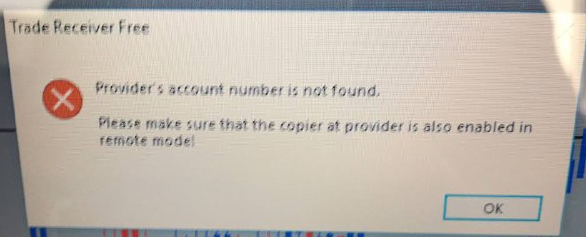
This error may come up as a result of removing the providers from your list. This may also be due to some issue with the copier on UL’s end. If this happens please advise an administrator and request that the copier at the provider side be checked and possibly disabled/re-enabled.
Lot Sizes Fixed To Multiples of 1 Lot
Ensure that the copier is running on a chart that supports the lot sizes you want. For safety use a regular pair on a chart like EUR/USD.
Fluctuating TP
Broker (FIFO) Issue
The first thing to do is verify whether or not your broker is a US regulated (FIFO ). Please see the link below for more details.
https://www.babypips.com/news/faq_fifo_in_the_forex_market
From what we’ve seen, multiple positions of the same size on the same pair need to have the same TP. For this issue you would have to change the broker. If you don’t want to change the broker then the fluctuations will continue.
A workaround would be to disable the copying of the SL and TP. The trades should still close on your account once they are closed on the provider side. This will also allow you to set your own SL/TP.
If this does not work for you - then you may have to change the broker. Check your journal for any messages similar to the one pictured below.

Additional EA Issue
Based on discussions with the developer of the copy software, it may be due to conflicts with another EA on the system. It is best to run the copier on a clean MT4 installation.
When setting up your MT4 click on SETTINGS and add a character or number to the end of the install path and the program group. Install the copier on this new setup and the problem should go away. Please see the setup documentation for additional screenshots.
Copier Enabled But No Trades
This error was seen when the copier was not updated. Ensure that all of the URLs are put in (see COPIER NOT WORKING section). Ensure that AUTO TRADING is enabled. Please see the INSTALLATION SECTION for additional information.
Error: Add URL (But You Already Added It)
If the copier keeps showing an error to add a URL to MT4 but you've already added it, most likely you're on a laptop and it's not plugged in. This error comes up whenever the copier cannot reach the URL. This can be caused by:
- Laptop in power saving mode periodically cutting data transmissions over wifi.
- PC/laptop waking from sleep mode.
- PC/laptop having internet connection problems.
To fix this - with laptops - usually it means keeping them plugged in. There are no details on any specific power management settings at this time, but that's the most likely reason why this error would keep showing up.
Cannot Update
If you can't update the copier there are two options.
- Download the latest version from the autofxpro.com website.
- Download the older version from Google Drive and then allow it to update when started.
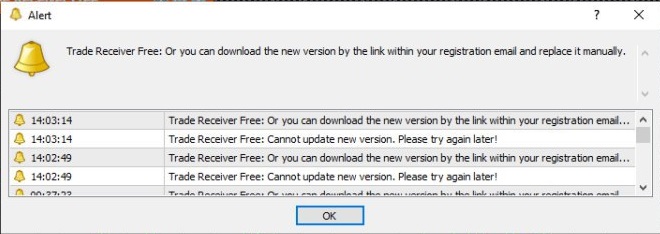
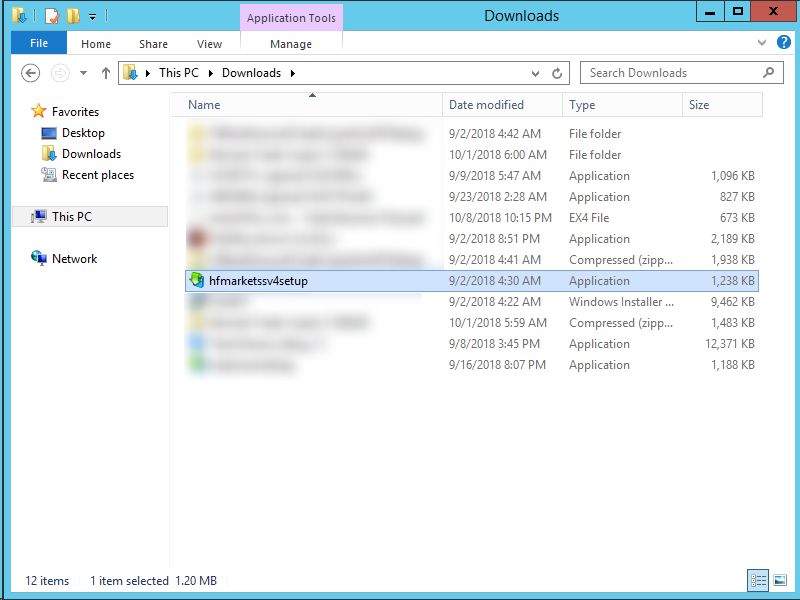
Both options have been tested and proven to work. Pick whichever is more convenient. You may have the old version in your DOWNLOADS folder. You could try option 2 first if this is so.
PROVIDERS
As with the clients, the documentation assumes that you're using MT4. The instructions are exactly the same for MT5 - just follow and use the EX5 instead of the EX4 file if you have MT5.
Installing
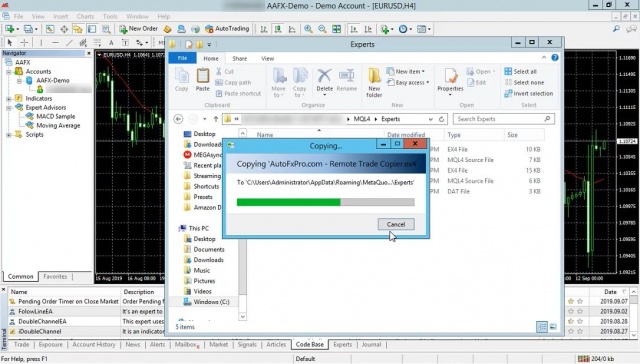
It's assumed that you already have your MT4 platform setup. You should have gotten a download link after purchasing the software. Extract the files and then go into your EXPERTS folder for the MT4 that you'll be using.
Copy the EX4 to the EXPERTS folder.
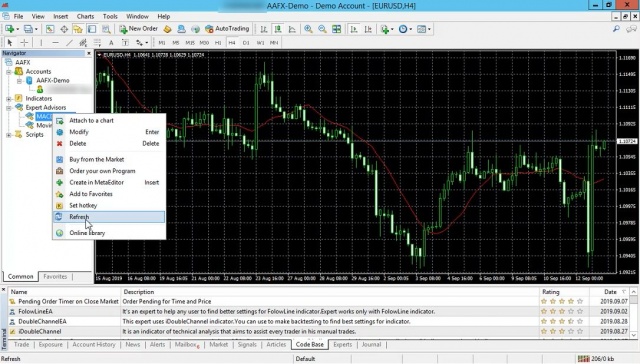
Refresh your Expert Advisors in MT4 or restart MT4.
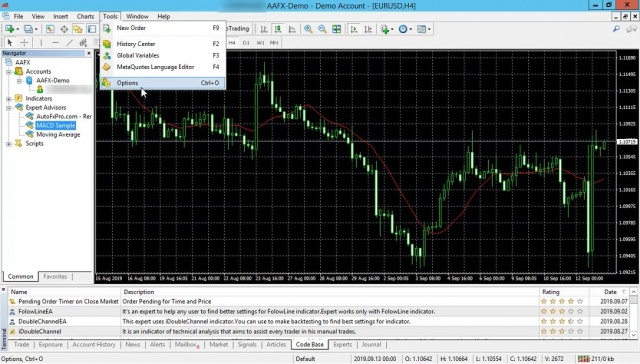
Go to OPTIONS and then put in the URLs.
- http://copy.autofxpro.com/
- http://register.autofxpro.com/

Setting Up License
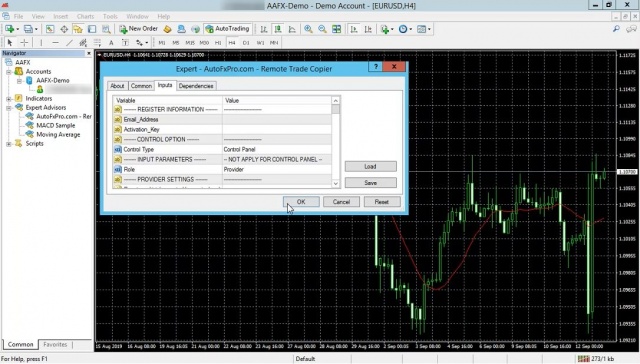
Once you're done - double click on the AutoFxPro EA from the list in the navigator window. You may also drag it onto the chart. Switch to the INPUTS tab and put in your email address and license key.
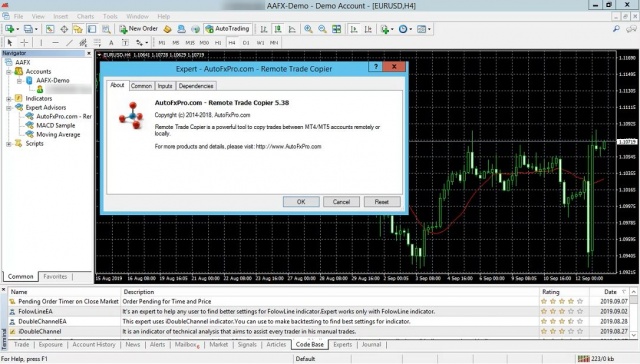
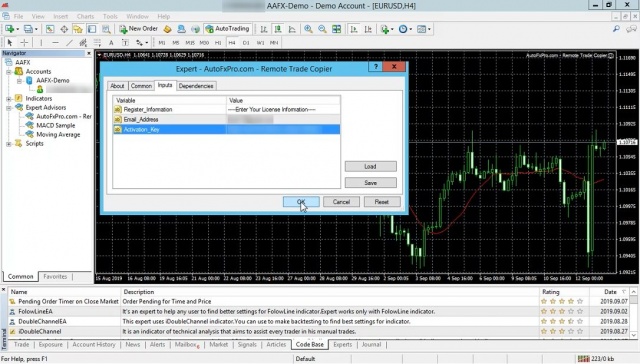
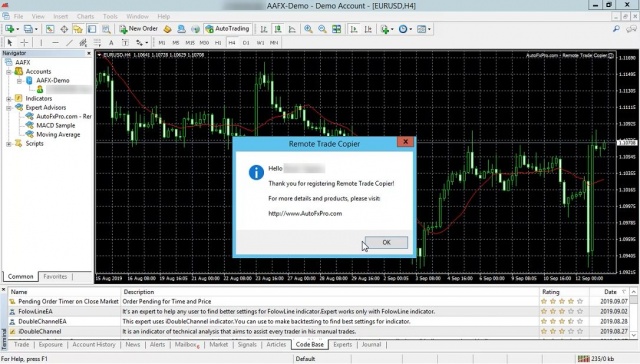
If your details are correct, the copier will be registered and you can proceed. If the copier was not up to date then you'll be prompted to update thereafter.
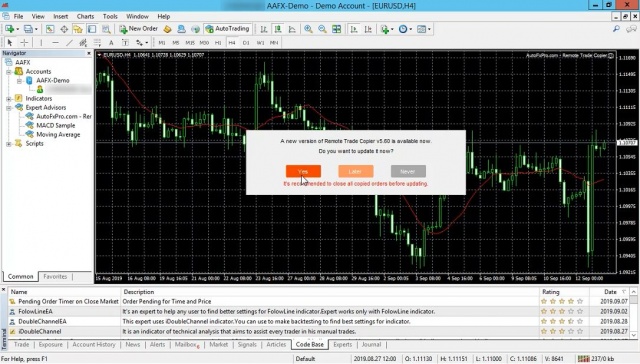
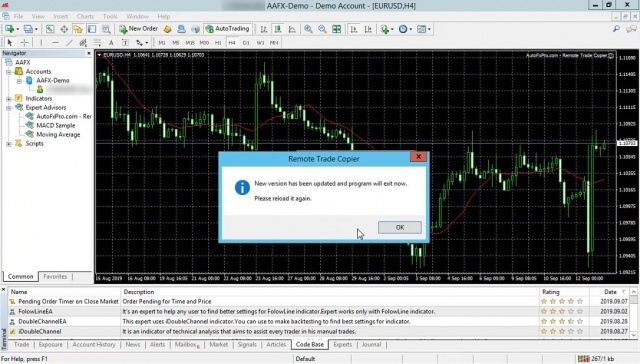
If the program shows EXITING, PLEASE WAIT - just wait until the chart is clear.
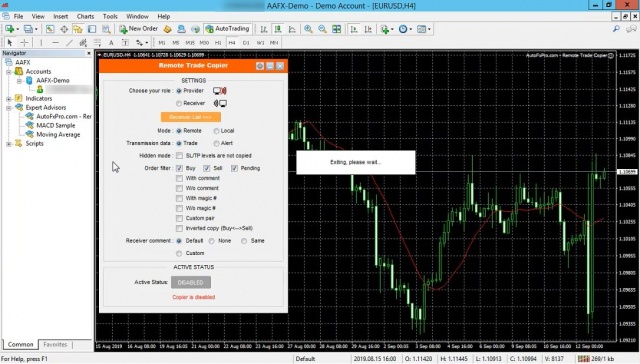
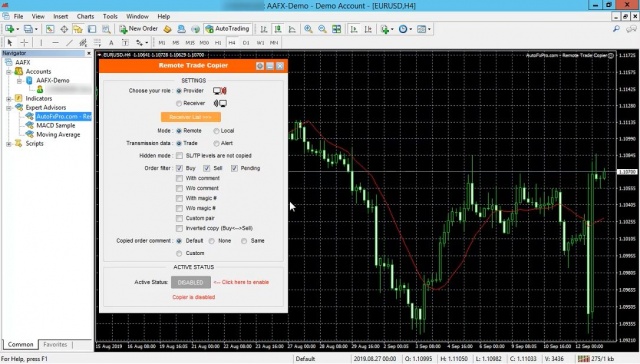
Once it's done - double click on it again (or drag it onto the chart). You do not need to put back your registration details if it was successfully registered initially. The details are saved and the values are blank so that persons won't be able to see and steal your key for usage.
Adding Receivers / Local Copies
The copier may be used in remote or local mode. In remote mode you must add the MT4 account number for each receiver. In local mode you only need the provider number to be placed in each client.
Remote Provider
If you're going to be sending signals over the internet, then ensure that you have the account numbers for the persons that will be copying. If your service is a paid service then check your subscription list and you can then enable/disable receivers as needed. Firstly, go to the RECEIVER LIST.
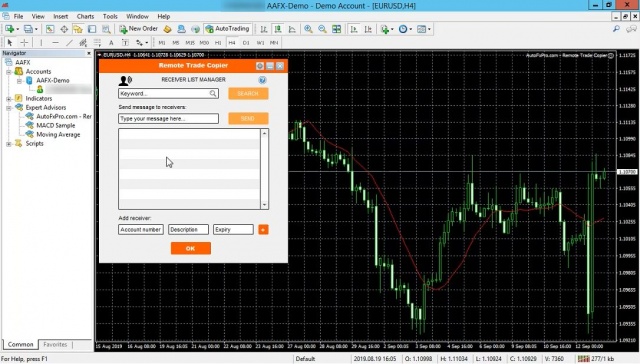
From this screen you can add the ACCOUNT NUMBER for each receiver along with a DESCRIPTION. Usually the subscriber name or email address is placed here to make them easier to be found. You may also set an EXPIRY which would automatically disable the account once the expiry date is reached.
Local Copy
This mode is faster than remote and the prompt that appears when you switch the modes tells you just that.
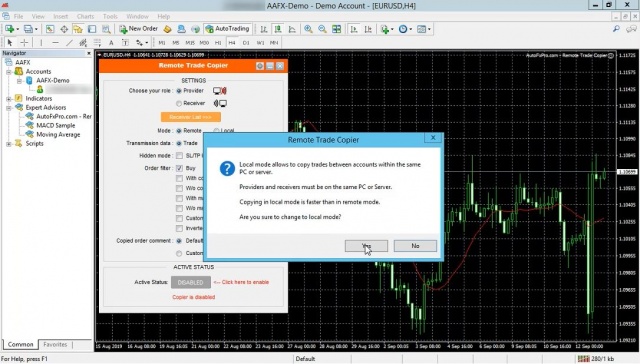
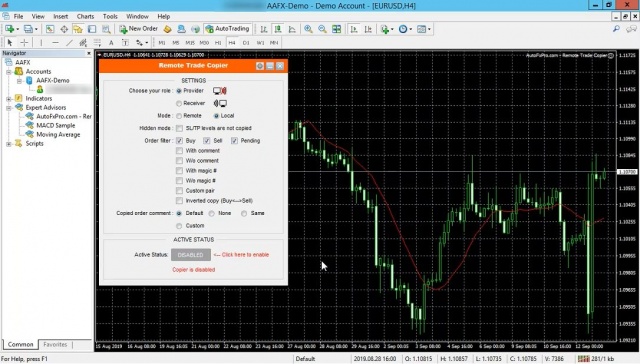
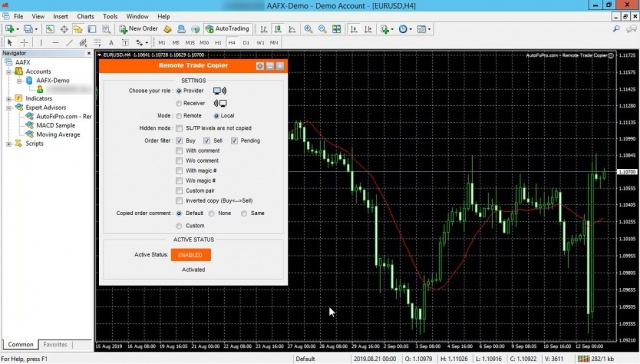
Just like the receiver - you simply press the DISABLED button to enable the provider. Note that in LOCAL mode there is no subscriber list. All you need to do is put in the provider number in all of the receivers for trades to be copied.
